 | ||
| Your browser is not supported. | ||
|
Please browse our site using any of the following options:
| ||
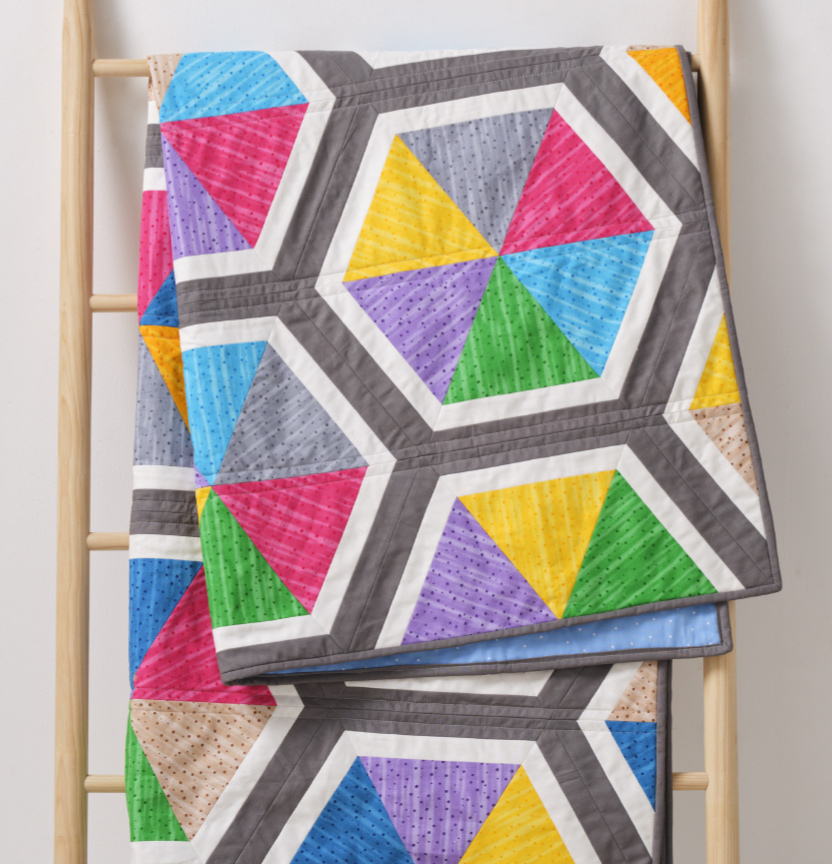
BLENDER HEXIE QUILT

Level: Intermediate
What you'll need:
- Waterfall Blender Fabrics - 1m of each of the 9 colours: Aqua, Royal, Grey, Natural, Gold, Lemon, Fuchsia, Purple, Kiwi
- White Fabric (for Edge Strip) - 1m
- Brown Background - 2m
- Binding - 0.6m
- Backing fabric - 4m
- 2 metres cotton/polyester batting
- Matching Gutterman 100% cotton thread
- Rotary cutter, mat and quilters ruler
- Quilting pins, tape measure
- Scissors, seam ripper
- Hand sewing needle
- Sewing machine foot and walking foot
- Marking pen
- Templastic or thick card to cut Rainbow Shape for use as template
Note: All fabric should be 100% cotton, washed and pressed. 1/4" seam allowance is used throughout unless indicated.
Please read all instructions carefully before commencing the quilt.
Instructions
Terms:
WOF- Width of Fabric.
Template Preparation:
Prior to commencing, print out the Template pattern pages. Check the 1" square against your ruler to ensure template has printed at correct size. Cut Shapes 1, 2, and 3 on the inside of the line then place on to your Templastic or cardboard and trace around. Cut. These templates will be used to cut all pieces to create triangle shapes.
Cutting Instructions:
Step 1- Cut 3 x 6.5" wide strips from WOF from each of your 9 Waterfall Blender fabrics.
Place Template 1 on to each strip of fabric and cut along the two sides (see Diagram 1) creating your triangle shapes.
Turn Template 1 in the opposite direction matching the three edges and cut your next triangle shape. Continue with this method for the remainder of the strip.
Each strip of fabric will yield 6 shapes.
Tip: If you are a confident sewer, you can place 2-3 of your fabric strips on top of each other and cut multiple triangles at the one time with your rotary cutter.
Step 2- From the white fabric cut 28 x 1.5" wide strips across WOF.
Step 3- Using Template 2 and following the same process as above for cutting Template 1 shapes, cut your Template 2 shapes.
Step 4- From the background fabric, cut 42 x 1.5" wide strips across WOF.
Step 5- Using Template 3 and following the same process as above for cutting Template 1 shapes, cut your Template 3 shapes.
Binding fabric:
Cut 8 x 2.5" wide strips from WOF.
Step 1- Referring to Diagram 2, and with right sides facing, pin Shape 1 and Shape 2 together ensuring that Shape 2 is centred and that there is a small 1/4 overlap at each end where the pointy ends meet (see Diagram 3). Sew and press seams to one side. Repeat for all Shape 1 and Shape 2 fabrics.
Step 2- Again, referring to Diagram 2, and with right sides facing, in the long edge of Shape 2 to Shape 3, again ensuring that Shape 3 is centred and that there is a small 1/4 overlap at each end where the pointy ends meet (see Diagram 3). Sew and press seams to one side. Repeat for all Shape 2 and Shape 3 fabrics. You have now completed your blocks.
Step 3- Referring to the photo lay your blocks out in a pleasing manner, creating the colourful hexagons.
Step 4- Working in rows, pin and sew the blocks together pressing seams to one side. You will have 8 rows.
Step 5- Keeping your rows in order join to each other, completing the quilt top. The long edges will not be straight i.e. there will have a diamond type shape along each long row. This will be trimmed later.
Quilt top is now complete.
Step 6- Cut backing fabric in half so that you have two 2m lengths. Join together on the long side to create a large backing piece. Press seams.
Step 7- Lay the backing, batting and quilt top. Baste together. Quilt as desired.
Step 9- Referring to Diagram 4, trim the long sides of your quilt creating a nice straight edge.
Step 10- Join binding strips, fold in half and iron. Sew binding around quilt.


