 | ||
| Your browser is not supported. | ||
|
Please browse our site using any of the following options:
| ||
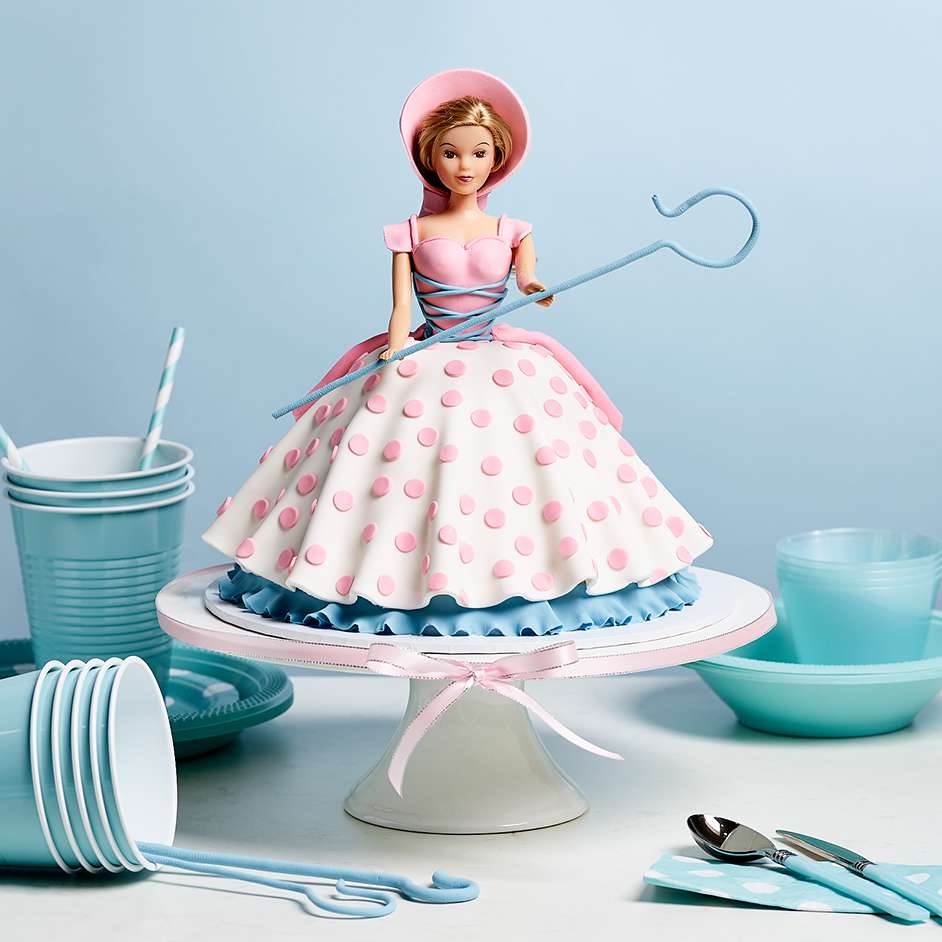
LITTLE BO PEEP CAKE

Level: Intermediate
WHAT YOU'LL NEED
- 'Wilton' Dolly Varden Mold Pan
- 'Wilton' Mini Cut-Outs Set
- 'Wilton' Color Right Performance Color System
- 'Wilton' Decorating Tip #224
- 'Wilton' Dolly Pick - Blonde
- Rolling pin
- Offset spatula
- Fondant
- Buttercream or ganache of your choice
- Disposable gloves
- Cake board
- Round cookie cutter (3" wide approx)
- Cutting tools
- Edible glue or water
INSTRUCTIONS
Step 1 - Bake your cake using the wonder mold pan. Grease and flour your pan and then pour in preferred cake batter. Don't overfill the pan, leave about 3/4 inch from the top to allow your cake to rise and not spill over. Let the cake cool completely.
Step 2 - While your cake cools, start colouring your fondant. Use your disposable gloves for this step. To create the pink, add 5 drops of red and 3 drops of pink and to get iced blue use 4 drops of blue and 1 drop of pink. The Wilton Color Right Performance system is great to use, it comes with 8 colours and a chart of how to mix the colours together to create 48 different colours.
Step 3 - After you have your desired colours, place in an airtight container and start decorating the bodice of the doll pick. You can do this in sections by creating a front panel stick it on and shape it to her figure and then attach a panel to cover her back. Cut out a triangle from the top section to create a sweetheart neckline. Stick the fondant on with edible glue or a bit of water.
Step 4 - Once the cake is cooled, secure the base of the cake to the cake board with a dollop of buttercream or ganache. Next, frost the cake so the fondant has something to stick to. You can cut the cake in layers if you like and ice in between or you can leave it as is and just frost the outside.
Step 5 - An optional step you can add is a frill at the bottom by cutting a strip of fondant that goes all the way around the base of the cake and using the rolling pin or the back of a spoon, roll along one edge of the strip to give a ruffle effect then attach this before you put the fondant skirt over the cake.
Step 6 - Roll your fondant out in a circle approx 3mm thick. To get a perfect circle, place a 13-inch cake board over the fondant and then cut around it. Cover your cake with the fondant pressing at the top to secure it to the frosting and let the bottom hang looser to create creases and draping effect.
Step 7 - After securing the skirt, place the doll in the center of the cake and attach the waist seam like with a strip of fondant.
Step 8 - Using the Wilton cut-outs, punch out the fondant details for the dress and start embellishing your dress, sticking the fondant pieces on with edible glue or water. You can add little buttercream roses using the Wilton #224 tip along any seam you don't want exposed.
Step 9 - For the hat accessory, roll out a fondant circle 3 inches in diameter place on the head, wrap behind the neck and stick together with a strip of fondant and a bit of edible glue/water. To make a cane, roll out a thin blue strip of fondant, shape it in a cane and lay it flat to air dry before placing it on the cake, for best results let the cane dry over 8 hours or preferably overnight.


