 | ||
| Your browser is not supported. | ||
|
Please browse our site using any of the following options:
| ||
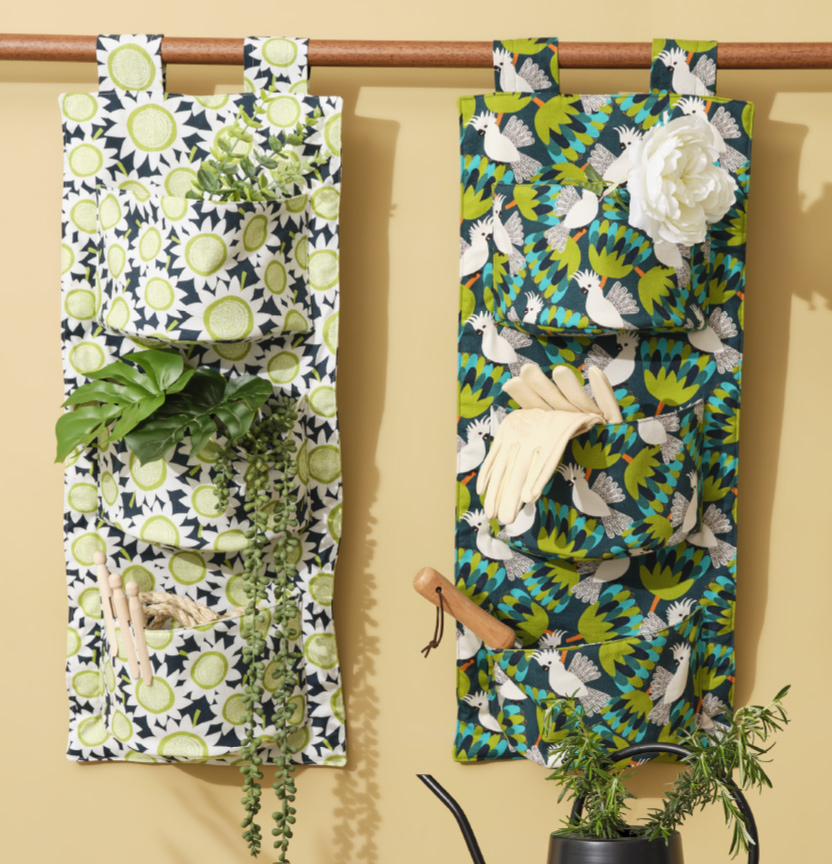
JOCELYN PROUST HANGING STORAGE CELLS

Level: Intermediate
WHAT YOU'LL NEED
- 1m Jocelyn Proust - Cockatoo Flight/Dusk
Floral/Sunny Flower - 75cm x 32cm Legacy cotton batting
- 20cm Legacy Fuse-N-Shape 1-sided
- Fusible (L-71F)
- 20cm Vlieseline Iron-On Volume Fleece
- Matching Gutermann 100% cotton thread
- Scissors, seam ripper
- Pins, tape measure
- Optional - rotary cutter, quilters ruler
- *Sew Easy Quilters Holding Clips or Birch Wonder Clips (make sewing base & sides of pockets together easier using pins)
- Hand needle
- Frixion marking pen
- Sewing machine
- Template plastic or cardboard
- Length of dowel
- String of your choice to hang
INSTRUCTIONS
1cm seam allowance used throughout unless otherwise indicated.
Read all instructions carefully before commencing the project.
TEMPLATES
Using template plastic or cardboard create a 23cm diameter circle and a 20cm diameter circle. Cut the 20cm circle in half to make a semi-circle.
CUTTING
- From fabric cut two rectangles 32cm wide x 75cm long for backing panel, 6 rectangles 34cm wide x 16.5cm for pocket fronts, 2 x 15cm squares for hanging tabs, 3 x 23cm diameter circles for pocket bases using 23cm circle template.
- From Iron-On Volume Fleece cut 3 rectangles 33cm wide x 15.5cm.
- From Legacy Fuse-N-Shape cut 3 x 20cm diameter semi-circles using template.
Step 1 - Hanging loops: Fold 15cm square in half, sew together down one long edge, press seam open. Turn right side out and press with seam in centre back. Topstitch 1cm in from each long edge, then topstitch 2cm in from each long edge and press. Fold in half with raw edges together and press.
Step 2 - Backing panel: Lay cotton batting down flat with one fabric panel right side up on top. Pin one folded hanging loop 5cm in from each side edge with raw edges aligned. Place remaining fabric panel face down on top and pin 3 layers together around the edge.
Step 3 - Sew together around the edge leaving a 12cm opening in the bottom edge. Clip corners and trim batting away from seam allowance (this removes bulk when topstitching). Turn right side out, pushing out corners and press. Press in edges of opening and topstitch around edge securing bottom opening within stitching.
Step 4 - Pockets: Fold a 23cm diameter circle in half and press. Open out and insert one 20cm diameter semi-circle of Legacy Fuse-N-Shape with straight edge pushed into the fold. Refold and press to fuse. Sew together around the curve of the semi-circle. Repeat for the remaining two circles.
Step 5 - Centre one Iron-On Volume Fleece rectangle onto a 34cm wide x 16.5cm fabric rectangle and fuse. Place right sides together with another 34cm wide x 16.5cm fabric rectangle. Pin together across the long top edge (check as fabric is directional) and down each side. Sew together across top and down each side. Clip top corners, turn right side out pushing out corners and press. Topstitch along top edge. Sew together across the bottom edge. Repeat for remaining rectangles.
Step 6 - Using small sharp scissors make snips all along the bottom edge of the pocket rectangle approx. 1cm apart, taking care not to cut through the stitching. Repeat around the curve of the semi-circles.
Step 7 - With a semi-circle pocket base right side up place pocket rectangle right side down on top. To clip (or pin) the bottom clipped edge of the pocket rectangle to the curved edge of a semi-circle pocket bottom, start by matching the centre marks first and placing a clip in the centre. Then place a clip at each end and add more clips to ease the rectangle around the curved edge. Sew together around the curved edge. Trim the seam allowance and neaten with a zigzag stitch or overlock. Press well. Repeat to make remaining two pockets.
Step 8 - Pocket Placement: Lay backing panel out flat and with right side facing up use Frixion pen to mark a 22cm long line along the bottom 5cm up from the bottom edge and 4cm in from each side edge. Mark 14cm vertical lines up from each end. These are the lines for placing the bottom pocket. For the second pocket measure 7.5cm up from the top of the vertical lines and mark a 22cm long line across then mark 14cm vertical lines up from each end. For the top pocket measure 7.5cm up from the top of the vertical lines and mark a 22cm long line across then mark 14cm vertical lines up from each end.
Step 9 - Attach Pockets: Starting at the bottom and with the outside of the pocket showing, pin the bottom straight edge of one pocket over the 22cm long straight line at the bottom of the backing panel. Stitch along the straight bottom of the pocket 3mm from the edge, backstitching at beginning and end.
Step 10 - Working on one side at a time, pin one side edge of the pocket along the marked line. Stitch along the side edge of the pocket 3mm from the edge, backstitching at beginning and end. Repeat for the other side of the pocket.
Step 11 - Repeat Steps 9 and 10 to attach the remaining two pockets to the marked lines.
Step 12 - To hang slide a length of dowel through the hanging loops. Next tie an end of your string to one end of the dowel, allowing enough length for your desired hanging height. Tie the other end of your string to the other side of the dowel, and your storage cells are ready to hang!


