 | ||
| Your browser is not supported. | ||
|
Please browse our site using any of the following options:
| ||
FROZEN CAKE

Level: Advanced
WHAT YOU'LL NEED
- 1 x Mondo Dolly Varden Tin - regular size (not the small unless making a smaller doll)
- 2 x Portions of Moreish Buttercake Cake (bake as per instructions and recipe below)
- 2 x Tubs of White Over the Top
Buttercream
- 2 x Tub of Blue Over the Top Buttercream
- 1 Tub of Blue Edible Slime
- 1 Set of Round Mondo cookie cutters
- 1 x 12" Round white Mondo cake board
- Chefmaster Gel Food Colours in Sky Blue
(to colour the buttercream)
- 1 Tub of White Fondtastic Fondant
- A sharp knife
- Mondo snowflake plunger cutters
- Over the Top Sprinkles in white
- 1 Small Mondo rolling pin
- 1 Packet of Mondo plastic pipping bags
- Various Mondo piping tips in your choice
- 1 Jar of Over the Top Edible Glue
- A little cling wrap
- A Frozen Elsa Barbie sized doll
INSTRUCTIONS
Step 1 - Bake 2 portions of Moreish Buttercake into the Mondo Dolly Varden cake tin - remember to oil or butter the tin well to ensure ease of removal of baked cake. Once completely cooled, trim the bottom of the cake so that it's flat and close to the height of the Dolly varden tin - it's the right height for Barbie dolls. Cover the cake in your favourite filling. It can be Buttercream or ganache by using a small Mondo Off Set Palette knife - it helps smooth the surface and avoid bumps under your Buttercream.
Step 2 - Place the cake a little further backon the Mondo 12" cake board, not right in the middle to give you room later on to decorate and add names etc to the board.
Step 3 - Colour the Over The Top white buttercream with the Chefmaster sky blue gel food colouring until you get the desired colour. Mix 3 different shades of blue for the dress, and keep some butter cream white.
Step 4 - Pick your favourite Mondo piping tips, I would suggest using the couplers so you can swap the tips around mid piping to create different effects in different colours.
Step 5 - Using a shape knife, cut a round hole in the top of your baked dolly cake, and pop in a little Buttercream. Wrap your doll from the hips down in cling wrap. Put her arms above her head and wrap her from the shoulders up in cling wrap as well - therefore, arms, head and hair as shown. We also wrapped up her cape. Push the doll gently into the cake without damaging the wall.
Step 6 - Knead a little fondant and colour with the Chefmaster Sky Blue Gel to shades of blue, roll the palest fondant out to approx 3 to 4mm thick and wrap around the body of the doll - covering the dress, down past the waste and cover up to 1 inch of the dolly varden cake. We used a fondant cutter to form a sweetheart neckline before placing the fondant on the doll. A little edible sugar glue will help stick the fondant to the doll and the dress.
Step 7 - With the remaining colours press out slow flakes in different sizes and shade, plus the childs name for the cake. We pressed out a lot of large white snowflakes and cut them in half to use as a boarder around the cake later. Leave to dry - as the dryer they are, the easier it will be later - overnight is perfect.
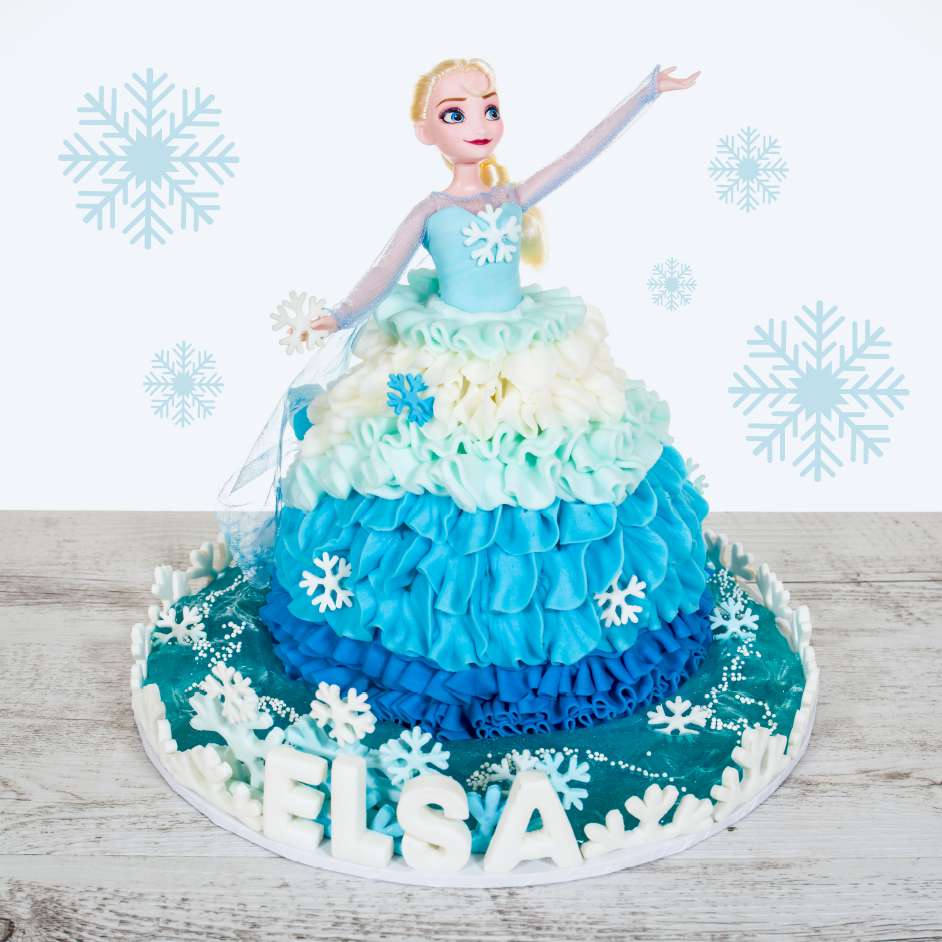
Step 8 - Next, having a bit of fun with your piping nozzles, pipe the dress of Elsa in the pre-prepared Buttercream. We went with an ombre effect starting at the bottom of her dress in dark sky blue Buttercream for 3 rows of ruffles. Next we pipped the medium sky blue in 3 layers of a different kind of ruffle. Next layers working up the dress, the pale blue. Finally the white ruffles and for fun to tie the entire look together, we used the pale blue Buttercream again around her waist to tie the top into the dress.
Step 9 - Next we popped a couple of flowflakes on her dress. Use a little Over the Top Edible Glue and attach the white 1/2snowflakes and name around the board as shown. You are creating a cute little snowflake fence.
Step 10 - Place some of the edible blue slime into a piping bag with no pipping tip. Snip the end of the bag off and pipe the gel behind your snowflake fence and around Elsa - like a blue lake.
Step 11 - Sprinkle some white Over the Top Sprinkles over the gel to create texture in the gel/water. We had a little fun with the extra snowflakes and decorated around the name and snowflake fence line. Take off the cling wrap around Elsa's head and position her arms in place. To finish place another bsnowflake in one of her hands.


