 | ||
| Your browser is not supported. | ||
|
Please browse our site using any of the following options:
| ||
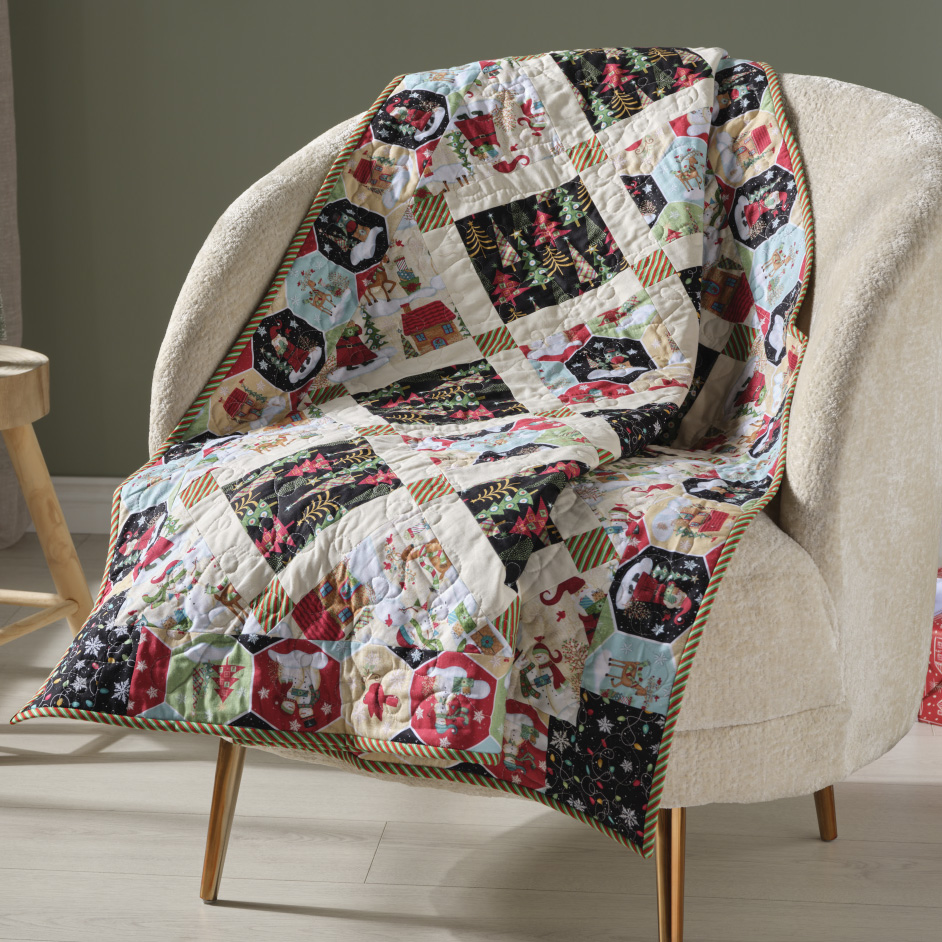
HOLLY JOLLY 2023 CHRISTMAS QUILT

Level: Beginner/Intermediate
What you'll need:
- 50cm Holly Jolly Xmas Trees
- 50cm Holly Jolly Xmas Fairy Lights
- 2m Holly Jolly Xmas Hexagons
- 1m Holly Jolly Xmas Stripe
- 1m Holly Jolly Xmas Scenic
- 60cm White fabric
- 3m Backing fabric
- 2m Cotton/polyester batting
- Matching Gutterman 100% cotton thread
- Rotary cutter, mat and quilters ruler
- Quilting pins, tape measure
- Scissors, seam ripper
- Hand sewing needle
- Sewing machine foot and walking foot
- Marking pen
All fabric should be 100% cotton, washed and pressed. 1/4 inch seam allowance is used throughout unless indicated.
Please read all instructions carefully and refer to downloadable project sheet before commencing the quilt.
Special Abbreviation
WOF - Width of Fabric
Finished Size
51.5" x 51.5"
INSTRUCTIONS
Cutting Instructions
Holly Jolly Xmas Trees fabric
Cut 2 x 6.5" wide strips from WOF. Cross cut to yield 6.5" x 6.5" squares.
Holly Jolly Xmas Fairy Lights fabric
Cut 2 x 6.5" wide strips from WOF. Cross cut to yield 6.5" x 6.5" squares.
Cut 1 x 4" wide strip from WOF. Cross cut to yield 4 x 4" x 4" squares.
Holly Jolly Xmas Hexagons
Cut 2 x 6.5" wide strips from WOF. Cross cut to yield 6.5" x 6.5" squares.
Cut 6 x 4" wide strips from WOF to be used for the outside border.
Holly Jolly Xmas Stripe
Cut 3 x 2" wide strips from WOF. Cross cut to yield 40 x 2" x 2" squares.
Cut 6 x 2.5" wide strips from WOF to be used for binding.
1m Holly Jolly Xmas Scenic
Cut 3 x 9" wide strips from WOF. Cross cut to yield 6 x 9" x 9" squares. Cut each square once diagonally (refer to diagram for Half Square triangles)
Cut 1 x 10.5" wide strip from WOF. Cross cut to yield 1 x 10.5" x 10.5" square. Cut the square both ways diagonally (refer diagram for Quarter Square triangles).
White fabric (sashing)
Cut 11 x 2" wide strips from WOF. Cross cut to yield 64 x 2" x 6.5" rectangles.
Sewing Instructions
Step 1 - Gather your range of 6.5" squares and determine the layout. You will require a total of 25 squares for the quilt top. There will be sufficient squares cut to choose and mix and match your fabrics in a pleasing manner.
Step 2 - With right sides facing, sew a 6.5" long sashing strip to the top edge of a 6.5" square. Press seams to one side.
Step 3 - Repeat Step 2 for the remaining 25 squares.
Step 4- Keeping your blocks in order and following the Layout Diagram, sew the squares together, creating rows, sewing the bottom side of the block to the sashing strip which you have already sewn to the next square.
Step 5 - Add a sashing strip to the bottom edge of the last square in each row.
Step 6 - Gather the remaining 2 x 6.5" sashing strips and small Holly Jolly Xmas Stripe 2" squares.
Step 7 - Following the Layout Diagram, sew the 2" squares to the sashing strips, to make the long sashing rows.
Step 8 - Pin a sashing row to one side of each row, ensuring that you match the seams. Sew and press seams to one side.
Step 9 - Gather your Holly Jolly Xmas Scenic Half Square triangles. Following the Layout Diagram and keeping your rows in order, sew to the ends of each of the rows. Press seams.
Step 10 - Following the Layout Diagram, sew your rows together to create the quilt top. Press seams.
Step 11 - Gather your Holly Jolly Xmas Scenic Quarter Square triangles and pin to each corner. Sew. Press seams.
Step 12 - Gather your Holly Jolly Xmas Hexagon 4" strips and join. Measure and trim to 45" long. You will require 4 of these.
Step 13 - Sew a 4" strip to the top and bottom of the quilt top. Press seams.
Step 14 - Sew the large 4" cornerstone squares to each end of the remaining two border pieces. Press seams.
Step 15 - Sew the side borders to the quilt top, matching seams for the cornerstone ends. Press seams.
Quilt top is now complete.
Step 16 - Cut backing fabric in half so that you have two 1.5m lengths. Join together on the long side to create a large backing piece. Press seams.
Step 17 - Lay the backing, batting and quilt top. Baste together. Quilt as desired.
Step 18 - Join the Holly Jolly Xmas Stripe binding strips to create one long strip. Fold in half and iron. Sew binding around quilt.


