 | ||
| Your browser is not supported. | ||
|
Please browse our site using any of the following options:
| ||
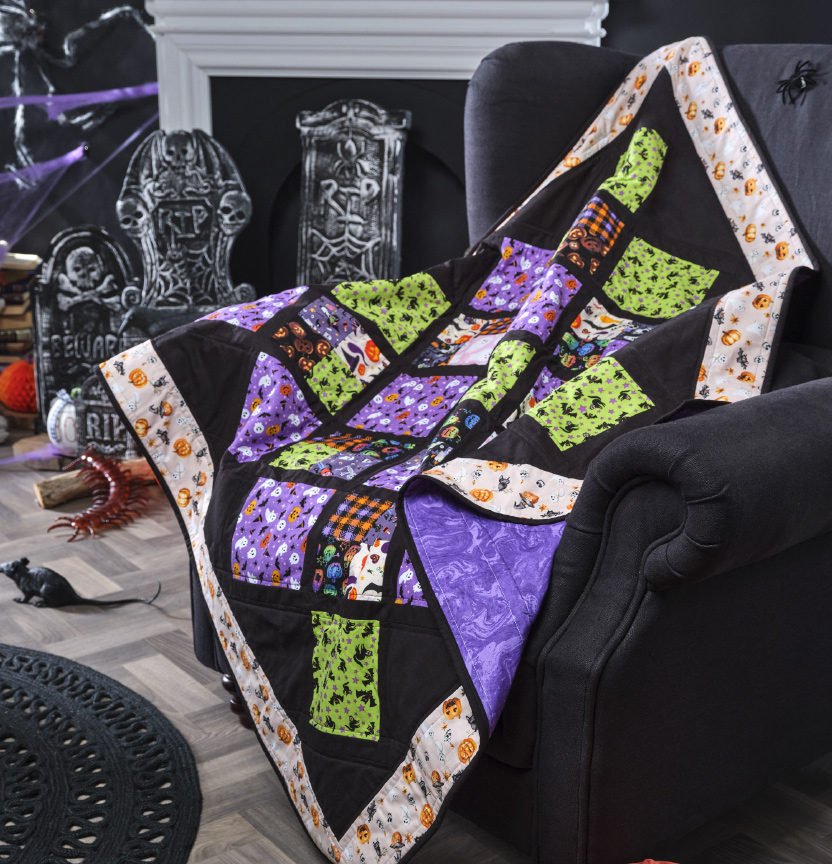
HALLOWEEN QUILT

Level: Intermediate
What you'll need:
Note: All fabric should be 100% cotton, washed and pressed.
1/4" seam allowance is used throughout unless indicated.
- 50cm Ghosts Mix purple
- 50cm Black Cats lime
- 15cm Glowing Jack-O-Lantern Black
- 15cm Halloween check multi
- 15cm Neo pumpkins multicoloured
- 15cm Graveyard spook black
- 15cm Trick or treat purple
- 15cm Spooky fun multi
- 15cm Boo ghosts pink
- 2m Black fabric (for background)
- 1m Halloween Toss Pink
(for outside border) - 60cm Binding fabric
- 3m Backing fabric
- 5 metres cotton/polyester batting
- Matching Gutterman 100% cotton thread
- Rotary cutter, mat and quilters ruler
- Quilting pins, tape measure
- Scissors, seam ripper
- Hand sewing needle
- Sewing machine foot and walking foot
- Marking pen
Note: All fabric should be 100% cotton, washed and pressed.
1/4" seam allowance is used throughout unless indicated.
Please read all instructions carefully before commencing the quilt.
WOF- Width of Fabric
Cutting:
Ghosts mix purple
Cut 2 x 6.5" wide strips from WOF. Cross cut to yield 8 x 6.5" squares
Cut 1 x 3.5" wide strip from WOF. Cross cut to yield 3 x 3.5" squares
Black Cats lime
Cut 2 x 6.5" wide strips from WOF. Cross cut to yield 7 x 6.5" squares
Cut 1 x 3.5" wide strip from WOF. Cross cut to yield 3 x 3.5" squares
Halloween Toss Pink
Cut 6 x 4" wide strips from WOF to be used for the outside border
Black (background)
Cut 7 x 1.5" wide strips for short sashings
Cut 8 x 1.5" wide strips for long sashings
Cut 1 x 12" wide strip across WOF for setting triangles
Cut 1 x 7.5" wide strip across WOF for corner triangles
From the 1.5" wide strips cross cut
Short sashing - 32 x 6.5" long strips
2 x 8.5" long strips
2 x 22.5" long strips
2 x 36.5" long strip
2 x 50.5" long strip
From the 12" wide strip cross cut to yield 3 x 12" squares.
Cut both ways diagonally (refer diagram for Quarter Square triangles)
From the 7.5" wide strip cross cut to yield 2 x 7.5" squares.
Cut each square once diagonally (refer to diagram for half square triangles)
From each of the remaining 7 fabrics, cut 1 x 3.5" wide strip from WOF. Cross cut to yield 3.5" squares (these will be used for a mix and match of 4 patch squares)
Binding fabric
Cut 5 x 2.5" wide strips from WOF
Instructions:
Step 1- Gather your range of 3.5" squares and mix and match in a pleasing manner. Join together to make a total of 7 x 4 patch squares in total. Press seams to one side.
Step 2- Following the diagram, lay your 4 patch squares, Ghosts Mix and Black Cats squares in a pleasing manner. Join a 6.5" black sashing strip to the top edge of each square. Press seams to one side.
Step 3- Keeping your layout in order, join the sashing strip to the bottom of each square including a strip at the bottom edge of the last square in the row. You will now have 7 rows in total.
Step 4- Using your quarter square triangles and following the diagram, join to the ends of each row.
Step 5- Match your long sashing strips to the rows and join to one side.
Step 6- Again, referring to the diagram, join the sashing strips to the opposite side of each row.
Step 7- Join a half square triangle (corner) to each end of the centre row and to the side of the 2 shortest rows.
Step 8- Join the remaining seams of the rows to create your quilt top.
Quilt top is now complete.
Step 9- Cut backing fabric in half so that you have two 1.5m lengths. Join together on the long side to create a large backing piece. Press seams.
Step 10- Lay the backing, batting and quilt top. Baste together. Quilt as desired.
Step 11- Join binding strips, fold in half and iron. Sew binding around quilt.


