| ||
| Your browser is not supported. | ||
|
Please browse our site using any of the following options:
| ||


FIXER UPPER FARMHOUSE CELEBRATION QUILT
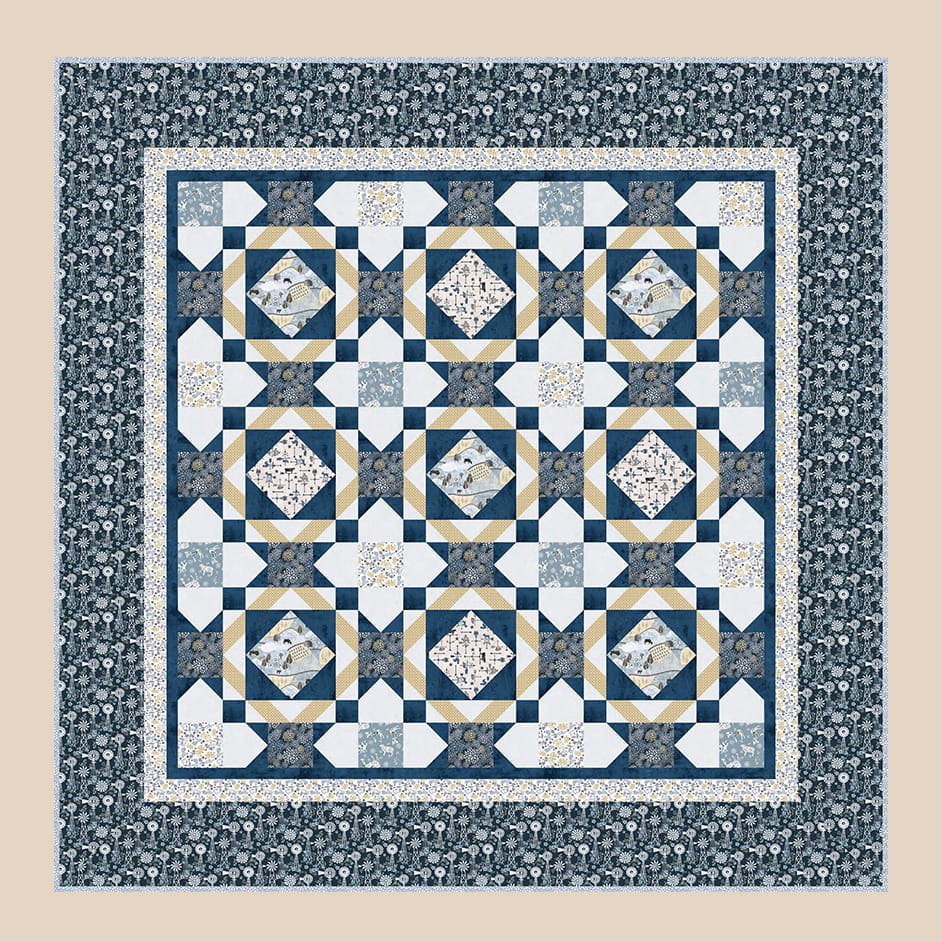
Level: Intermediate
What you'll need:
Fabric Requirements:
- Fixer Upper 112cm Cotton Quilting Fabric:
- Countryside (A) x 0.57 m
- Weather Vane (B) x 0.34 m
- Geo (C) x 0.61 m
- Mums Line (D) x 1.37 m
- Multi Mums (E) x 0.46 m
- Floral Farmyard (F) x 0.46 m
- Wildflower (G) x 0.46 m
- Surface Design (H) x 1.37 m
- Wind Power x 1.83 m
- Wildflower Scatter x 0.57 m
Backing (Purchased Separately):
- 44" (1.12m) wide Churndash Cheater Quilt - Steel Blue
Additional Materials:
- Batting 80" x 80" (2.03m x 2.03m)
- 100% Cotton thread
Instructions
Reference the downloadable project sheet for project pattern diagrams.
WOF: Width of Fabric
LOF: Length of Fabric
Please note: All strips are cut across the width of fabric (WOF) from selvedge to selvedge edge unless otherwise noted.
Cutting
Please note: All strips are cut across the width of fabric (WOF) from selvedge to selvedge
edge unless otherwise noted.
Fabric A, cut:
(2) 8 1/2" x WOF strips, sub-cut (5) 8 1/2" squares
Fabric B, cut:
(1) 8 1/2" x WOF strip, subcut (4) 8 1/2" squares
Fabric C, cut:
(8) 2 1/2" x WOF strips, subcut (72) 2 1/2" x 4 1/2" strips
Fabric D, cut:
(6) 4 1/2" x WOF strips, subcut (48) 4 1/2" squares
(9) 2 1/2" x WOF strips, subcut (144) 2 1/2" squares
Fabric E, cut:
(3) 4 1/2" x WOF strips, subcut (24) 4 1/2" squares
Fabric F, cut:
(1) 4 1/2" x WOF strip, subcut (8) 4 1/2" squares
Fabric G, cut:
(1) 4 1/2" x WOF strip, subcut (8) 4 1/2" squares
(3) 2" x WOF strips. Sew the strips together end to end with diagonal seams and cut (2) 2" x 54 1/2" strips
(3) 2" x WOF strips. Sew the strips together end to end with diagonal seams and cut (2) 2" x 57 1/2" strips.
Fabric H, cut:
(4) 4 1/2" x WOF strips, sub-cut (2) 4 1/2" squares
(9) 2 1/2" x WOF strips, sub-cut (132) 2 1/2" squares
(3) 1 1/2" x WOF strips. Sew the strips together end to end with diagonal seams and cut (2) 1 1/2" x 52 1/2" strips.
(3) 1 1/2" x WOF strips. Sew the strips together end to end with diagonal seams and cut (2) 1 1/2" x 54 1/2" strips.
Fabric I, cut:
(8) 8" x WOF strips. Sew the strips together end to end with diagonal seams and cut (4) 8" x 76" strips.
Fabric J, cut:
(8) 2 1/2" x WOF strips for the binding
Sewing
Sew using a 1/4" seam allowance with right sides together (RST) unless otherwise indicated. Always press towards the darker fabric while assembling, unless otherwise noted by the arrows.
Note: The arrows in figures represent the fabric print direction. Pay attention to the fabric and unit orientations when assembling the various components.
- Place (1) 4 1/2" Fabric H square on the top left corner of (1) 8 1/2" Fabric A square, right sides together (Fig. 1). Sew across the diagonal of the smaller square from the upper right corner to the lower left corner (Fig. 1). Flip open the triangle formed and press. Trim away the excess fabric from behind the triangle 1/4" away from the sewn seam (Fig. 2).
- Follow Figure 3 for the seam direction to add a 4 1/2" Fabric H square to each of the remaining corners of the 8 1/2" Fabric A square to make (1) Unit 1 square (Fig. 4).
- Repeat Steps 1-2 to make (5) Unit 1 squares total.
- Repeat Steps 1-2 and refer to Figure 5 for fabric identification, placement and seam
direction to make (4) Unit 2 squares. - Place (1) 2 1/2" Fabric D square on the left side of (1) 2 1/2" x 4 1/2" Fabric C strip, right sides together (Fig. 6). Sew across the diagonal of the square from the upper right corner to the lower left corner (Fig. 6). Flip open the triangle formed and press. Trim away the excess fabric from behind the triangle, leaving a 1/4" seam allowance (Fig. 7).
- Place another 2 1/2" Fabric D square on the right side of the 2 1/2" x 4 1/2" Fabric C strip, right sides together (Fig. 8). Sew across the diagonal of the square from the upper right corner to the lower left corner (Fig. 8). Flip open the triangle formed and press. Trim away the excess fabric from behind the triangle, leaving a 1/4" seam allowance to make (1) Unit 3 strip (Fig. 9).
- Repeat Steps 5-6 to make (36) Unit 3 strips total.
- Repeat Steps 5-6 and refer to Figure 10 for fabric identification, placement and seam
direction to make (36) Unit 4 strips. - Sew (1) Unit 3 strip to the left end of (1) Unit 4 strip to make (1) Unit 5 strip (Fig. 11). Repeat to make (36) Unit 5 strips total.
- Sew (1) 2 1/2" Fabric H square to each end of (1) Unit 5 strip to make the top row. Repeat to make the bottom row. Sew (1) Unit 5 strip to each side of (1) Unit 1 square to make the middle row. Sew together the (3) rows lengthwise to make (1) 12 1/2" Block One square (Fig. 12). Repeat to make (5) Block One squares total.
- Repeat Step 10 and refer to Figure 13 for component identification, placement and orientation to make (4) Block Two squares.
- Place (1) 2 1/2" Fabric H square on the top right corner of (1) 4 1/2" Fabric D square, right sides together (Fig. 14). Sew across the diagonal of the smaller square from the upper left corner to the lower right corner (Fig. 14). Flip open the triangle formed and press. Trim away the excess fabric from behind the triangle 1/4" away from the sewn seam (Fig. 15).
- Follow Figure 16 for the seam direction to add a 2 1/2" Fabric H square to the lower right corner of the 4 1/2" Fabric D square to make (1) Unit 6 square (Fig. 17).
- Repeat Steps 12-13 to make (48) Unit 6 squares total.
- Sew (1) Unit 6 square to each side of (1) 4 1/2" Fabric E square to make (1) Block Three strip (Fig. 18). Repeat to make (24) Block Three strips total.
- Sew together (1) 4 1/2" Fabric F square, (1) Block Three strip, (1) 4 1/2" Fabric G square, (1) Block Three strip, (1) 4 1/2" Fabric F square, (1) Block Three strip and (1) 4 1/2" Fabric G square, end to end and in that order from left to right, to make Row One (Fig. 19).
- Repeat Step 16 and refer to Figure 19 for component identification, placement and orientation to make Row Three, Row Five and Row Seven.
- Sew together (1) Block Three strip, (1) Block One square, (1) Block Three strip, (1) Block Two square, (1) Block Three strip, (1) Block One square and (1) Block Three strip, in that order from left to right, to make Row Two (Fig. 19). Repeat to make Row Six.
- Sew together (1) Block Three strip, (1) Block Two square, (1) Block Three strip, (1) Block One square, (1) Block Three strip, (1) Block Two square and (1) Block Three strip, in that order from left to right, to make Row Four (Fig. 19).
- Sew together the (7) Rows from Steps 16-19, lengthwise and in numerical order from top to bottom, to make the 52 1/2" x 52 1/2" Centre Block (Fig. 19).
Quilt Top Assembly
Follow the Quilt Layout while assembling the quilt top.
- Sew (1) 1 1/2" X 52 1/2" Fabric H strip to each side of the Centre Block. Sew (1) 1 1/2" x 54 1/2" Fabric H strip to the top and to the bottom of the Centre Block.
- Sew (1) 2" x 54 1/2" Fabric G strip to each side of the Centre Block. Sew (1) 2" x 57 1/2" Fabric G strip to the top and to the bottom of the Centre Block.
- Centre (1) 8" x 76" Fabric I strip on (1) side of the Centre Block and pin in place. Start sewing the strip a 1/4" from the top edge of the block and stop a 1/4" from the bottom edge. DO NOT TRIM THE EXCESS. Repeat with the opposite side.
- Repeat Step 23 to sew (1) 8" x 76" Fabric I strip to the top and to the bottom of the Centre Block, making sure to stop and start 1/4" away from each end of the block. To mitre each corner, fold the Centre Block on a diagonal, wrong side together. This should line up the strips from adjacent sides (Fig. 20).
- Starting at the sewn seam (represented by the arrow in Figure 20), draw a 45-degree line to the edge of the fabric. Sew on the drawn line. Trim the excess fabric, leaving a 1/4" seam. Repeat this step with the remaining corners to make the quilt top.
Layering, Quilting and Finishing
- Press the quilt top and 80" x 80" backing well. Layer backing (wrong side up), batting, pressed quilt top (right side up) and baste. Quilt as desired and trim excess batting and backing when quilting is complete.
Binding
- Cut the ends of the (8) Fabric G binding strips at a 45-degree angle and sew end to end to make (1) continuous piece of binding. Fold in half lengthwise and press wrong sides together.
- Sew the binding to the front of the quilt, raw edges together. Turn the folded edge to the back, and hand stitch in place.