 | ||
| Your browser is not supported. | ||
|
Please browse our site using any of the following options:
| ||
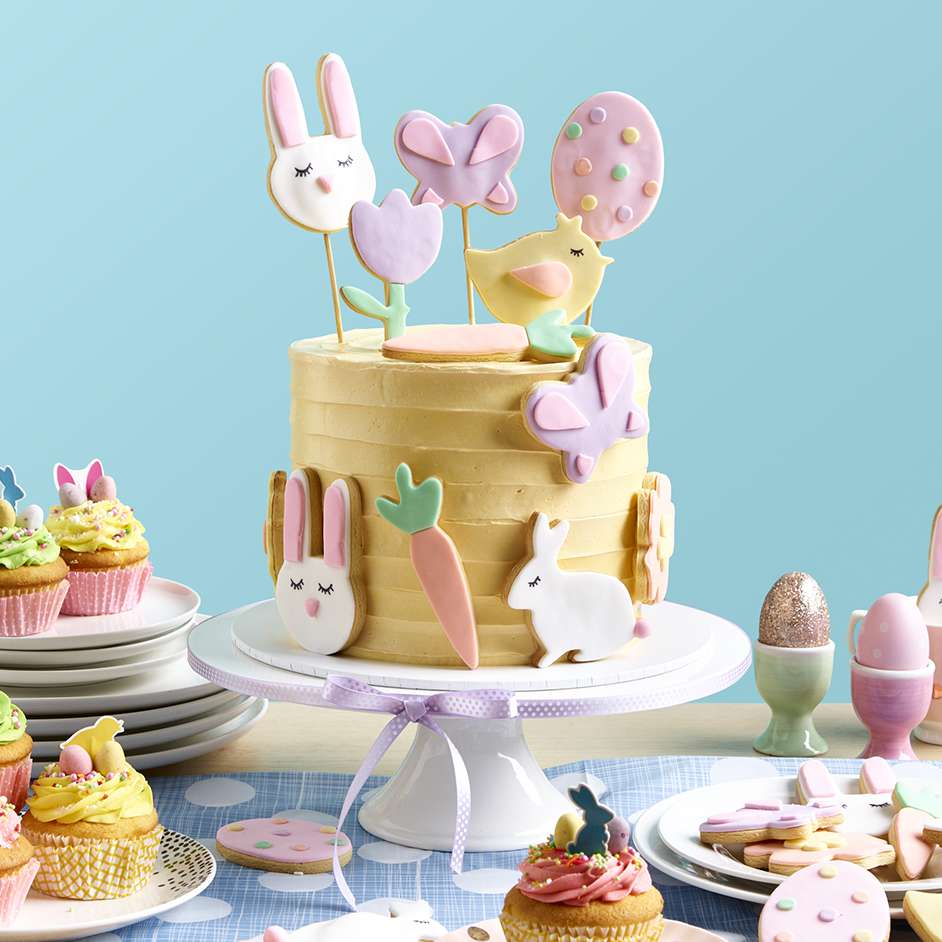
EASTER COOKIE CAKE & CUPCAKES

LEVEL: INTERMEDIATE
WHAT YOU'LL NEED
Cake Equipment
- 7 inch round 'Mondo' pro cake pan
- Cake mix/batter to make 2 x 4-inch-high cakes in above sized tin
- 10 inch black Mondo round cake board
- 'Mondo' cranked spatula
- 'Mondo' Acrylic Smoothers
- 'Mondo' cake turntable
- 1 large bucket of 'Over The Top' buttercream (for filling and base under fondant, may require more depending on how much filling you use)
- 'Chefmaster' Liqua-Gel Lemon Yellow
Cookies and Cookie Toppers
- 'Happy Easter' Cookie Cutters 4pk
- Sugar cookies in Easter cookie cutter sets
- 'Fondtastic' Fondant - White
- 'Chefmaster' Liqua-Gel leaf green, violet, rosy pink, sunset orange
- 'Chefmaster' Dual Tip Decorating Pens Black
- 'Wiltshire' 8 Pack Cookie Cutter Green
- 'Mondo' Fondant rolling pin
- 'Mondo' Assorted plunger cutters
- Bamboo skewers
- Thin paint brush
INSTRUCTIONS
CAKE ASSEMBLY
Step 1 - Bake 2 x 7-inch cakes according to instructions and let cakes cool.
Step 2 - Place each cake onto turntable and using a serrated knife cut dome off the top of the cakes so that are level (use the turntable to turn the cake as you cut so that it is even and level. Then cut in half so that you have 4 x 2inch layers.
Step 3 - Apply a small amount of buttercream to the centre of the cakeboard, then place the first layer of cake (ensuring it adheres well to the cakeboard)
Step 4 - Apply desired amount of buttercream on top of cake layer, then smooth and level using the cranked spatula (repeat for each layer of cake). Use the cake turntable to assist you to smooth and level each layer of buttercream.
Step 5 - Smooth a thin layer of buttercream over outside of cake with spatula and chill for at least 15 minutes (Crumb coat). This initial Crumb coat layer does not have to be perfect.
Step 6 - Gently squeeze a few drops of lemon yellow gel colour to remaining buttercream and mix to achieve a soft pastel yellow colour.
Step 7 - Apply a thicker layer of yellow buttercream, using the spatula to smooth the top and sides of the cake.
Step 8 - To create the ripple texture on the cake, place the rounded end of the spatula onto the cake and use the turntable to rotate the cake to create an even line all the way around. Repeat this process all the way to the top of the cake.
COOKIE DECORATIONS AND TOPPERS
Step 1 - prepare and bake Easter shaped sugar cookies and allow to cool. (For cookie toppers, gently insert a bamboo skewer into cookie dough, then bake allowing to cool completely before removing it off the baking tray)
Step 2 - Colour small amounts of white fondant using liqua-gel colours to achieve a variety of soft pastel colours.
Step 3 - Knead fondant in your hands to make more pliable and sprinkle a light dusting of corn starch on the hard surface or silicone mat to reduce sticking when rolling out.
Step 4 - Roll out your fondant to approx. 4mm thickness. Using the same cookie cutter used to cut your cookie shapes, cut out the fondant shape. Your fondant will be slightly smaller than the cookie (because cookies may spread when baked). You will need to use the top and bottom of the cookie cutters to achieve the different colours of the cookies.
Step 5 - Brush a very small amount of sugar syrup (water or jam) on the back of the fondant, just enough to make it lightly moist. If it's too wet it will make your cookie and fondant too soft and they may go soggy. Gently flip the fondant onto the cookie, then with your hands smooth the sides and edges.
Step 6 - Use an assortment of cookie cutters to cut fondant shapes for the additional details on each cookie. You can experiment with the Mondo heart and star plunger cutters to add some extra artistic flair. Your creativity is only limited by your imagination.
Step 7 - Use a black edible marker to draw eyes and eyelashes on your bunnies and chicken cookies.
DECORATING CAKE
Finally, decorate your cake by applying a small amount of buttercream to the back of the cookies and stick them around the side of the cake. Carefully insert the cookie toppers into the top of the cake, arranging them as desired.
TIPS
To achieve super-smooth edges on both the crumb coat and final layer, hold a metal bench scraper in your dominant hand and then use the other hand to grip the turntable so you'll be able to turn it as close to one complete rotation as you can.
Play around with some basic utensils for a textured final coat of frosting.
Add extra details on the cake by colouring a small amount of buttercream in pale green. Place in a piping bag with Wilton No. 68 Leaf Tip, and pipe some green leaves and grass around the base of the cake.


