 | ||
| Your browser is not supported. | ||
|
Please browse our site using any of the following options:
| ||
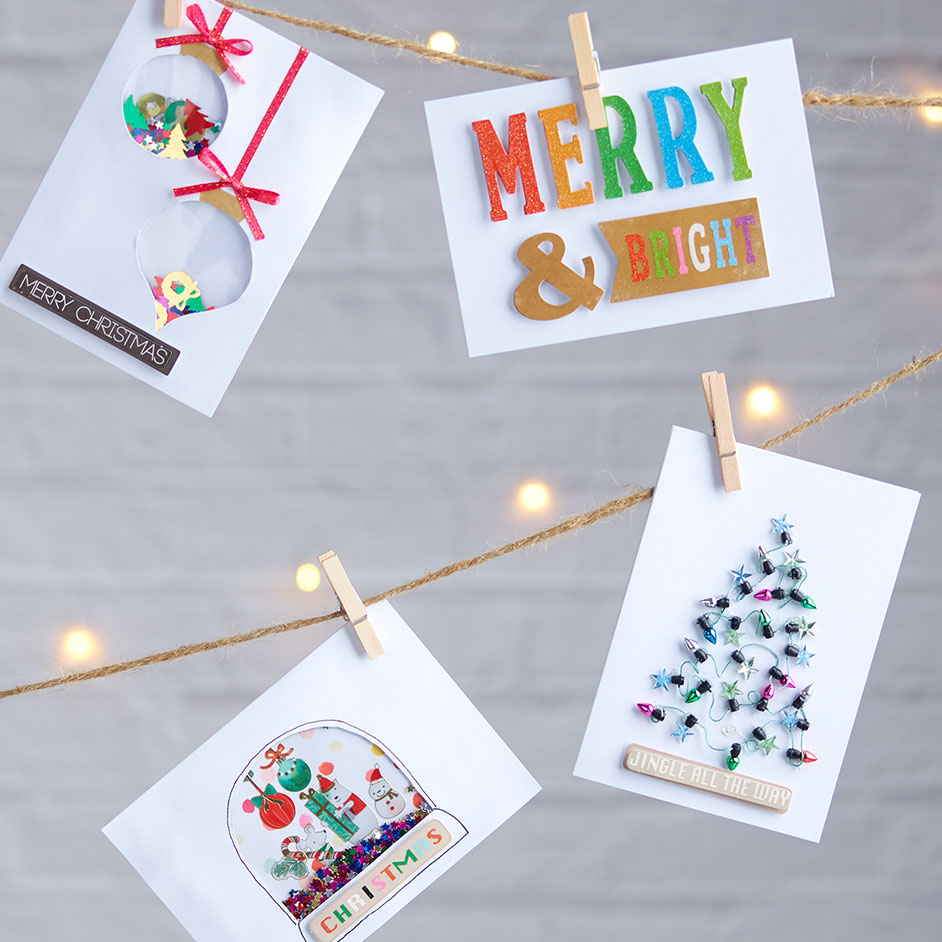
MERRY & BRIGHT CARDS

LEVEL: EASY
WHAT YOU'LL NEED:
- Jolly & Joy C6 Card & Envelope 6 Pack
- Jolly & Joy Confetti Merry & Bright
- Jolly & Joy Scrapbooking Stickers and
Embellishments of your choice - Jolly & Joy Bright Ribbon
- Hot Glue Gun
- Papercraft Glue
- We R Memory Keepers Fuse Tool
- Scrapbooking Page Protectors
- Clear Tape
- Scissors
- White and Printed Card
- Gold Pen
INSTRUCTIONS
SHAKER BAUBLE CARD
Step 1. Trace with a pencil 2 x bauble shapes on the inside of the front of the card.
Step 2. Carefully cut these shapes out with scissors
Step 3. Draw bauble toppers on the top of the baubles on the front of the card using the gold pen.
Step 4. Adhere ribbon from the bauble topper to the top of the card, leave a little overhanging and glue to the inside of the card
Step 5. Make a small bow and glue to each bauble
Step 6. With the Page Protector and the Fuse tool make a small pocket that is slightly bigger than the cut out bauble, you will need to ensure that 3 sides are fused together
Step 7. Fill the pocket with confetti and seal using the fuse
Step 8. Tape the pocket to the back of the card
Step 9. Cut a piece of white card and adhere to the back of the front of the card
Step 10. Embellish with a festive 3D sticker
MERRY & BRIGHT CARD
Step 1. Embellish with the Merry & Bright scrapbooking stickers as pictured
SHAKER SNOWGLOBE CARD
Step 1. Trace with a pencil the dome for the snowglobe on the inside of the front of the card
Step 2. Carefully cut out this shape with scissors
Step 3. With the Page Protector and the Fuse tool make a pocket that is slightly bigger than the cut out dome, you will need to ensure that 3 sides are fused together
Step 4. Fill the pocket with confetti and seal using the fuse
Step 5. Tape the pocket to the back of the card
Step 6. Cut printed card so it is slightly smaller than the front of the card
Step 7. Use stickers to embellish the snowglobe scene as desired
Step 8. Adhere this paper to the inside of the front of the card
Step 9. Embellish the bottom of the snowglobe with a festive 3D sticker
Step 10. Outline the snowglobe with a black ink pen
TREE LIGHTS CARD
Step 1. Using the Scrapbooking sticker lights hot glue the lights to the front of the card in the shape of a tree
Step 2. Embellish with a festive 3D sticker


