 | ||
| Your browser is not supported. | ||
|
Please browse our site using any of the following options:
| ||
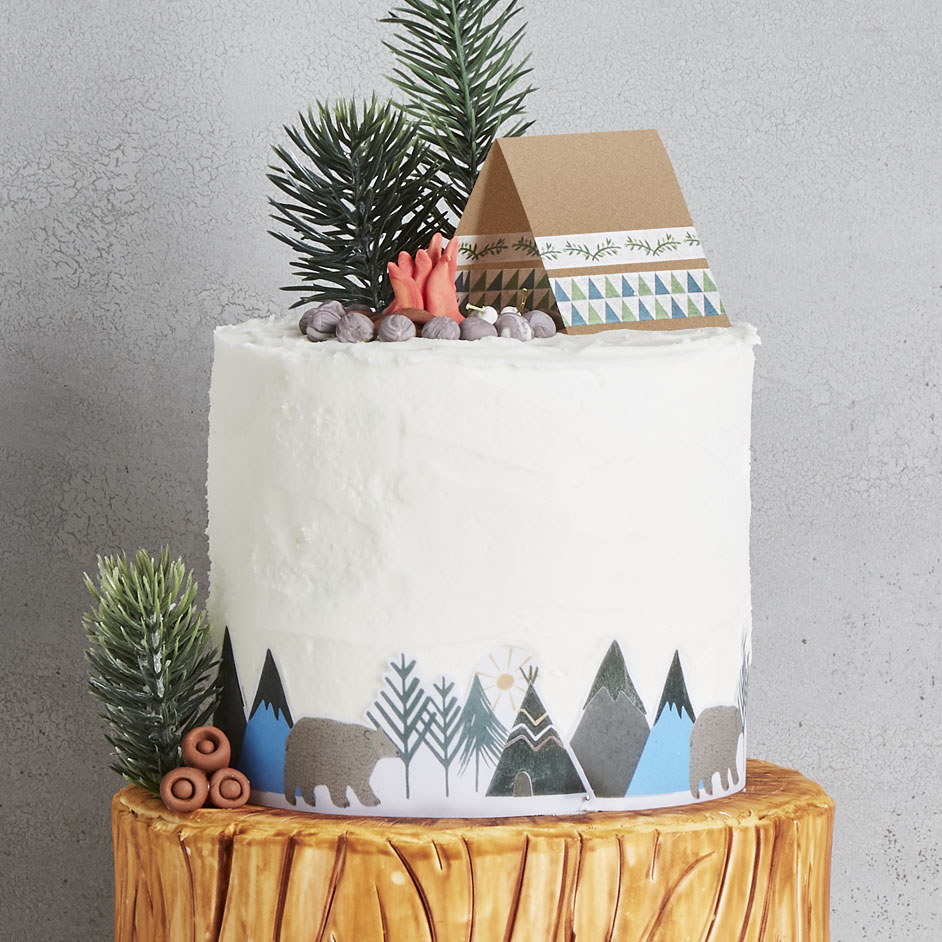
CAMPING CAKE

LEVEL: ADVANCED
WHAT YOU'LL NEED
- Fondtastic Fondant in white, brown, orange, ivory, black
- Over The Top 425gm Buttercream
- White Icing
- Chef master food decorating pens
- Wilton Icing Colour paint in Ivory
- Various fondant tools
- Spatula
- Leaf twigs from your garde
- Faux plant sprigs
- Water
- Paintbrushes
- Cardboard
- Washi Tape
- Camping Party Invitations
INSTRUCTIONS
Log like bottom tier
Step 2 -Roll out white fondant to 4 mm thickness and cut out a circle, 8" wide to cover the top of the bottom tier. Smooth it out with the smoothing tool.
Step 3 -Then mark a circle in the centre of the fondant circle using the veining tool and working your way out draw non connecting circles and mark lines from the center out that resemble the inside of a log.
Step 4 - Using the brown food decorating pens, go over some of the marked lines to emphasize them.
Step 5 -Using a little Wilton Ivory paint with a touch of water, paint the entire 8" circle blending in the darkened coloured lines from the decorating pen.
Step 6 -Put aside to dry for at least 4 hours.
Step 7 - Next roll out more white fondant and measure the side of 8" cake (height and width) and break it up into two rectangular pieces.
Step 8 -Using the same veining tool, embed uneven lines from left to right, making it resemble a tree log.
Step 9 -Again using same method as top circle mark some lines with the brown cake decorating pen and paint over it mixing some Ivory paint with water, depending on how dark you want your log to look.
Step 10 - Also put aside to dry for at least 4 hours.
Step 11 - Once paint has dried, brush some water onto your cake where the fondant will sit.
Step 12 - Gently lift the top circle piece and place onto the cake gently smoothing it down
Step 13 - Do the same with the side - brush some water and lift painted fondant pieces and attach to cake.
Step 14 -Using the veining tool add small indents to the side of the fondant pieces at the top making it resemble more of a log by not making it too straight.
Step 15 -Using the brown decorating pen again, go over some of the lines on the log to make them stand out.
Top Tier
Step 1 -Secure top cake on top of the bottom tier with some buttercream in the middle to hold in place.
Step 2 - Now, spread the buttercream icing to cover the top of the cake. Try not to lift the spatula too much to avoid having any crumbs throughout the icing. You can spread some of the icing towards the side of the cake and if you have excess you can take some of the extra icing off with the spatula.
Step 3 - Take some icing with your spatula hold it against the side on a 90 degree angle and spread it, covering the cake all around. It doesn't need to be completely smooth as the texture adds to the nature them of the cake.
Gumnuts
Step 1 - Using some brown fondant, roll out small five cent piece size balls and round up at one end using your fingers - making a gumnut shape.
Step 2 -Insert a twig at the end.
Step 3 -Then using the ball fondant tool, insert at the top round end making a small indent.
Step 4 - Roll out a small brown piece of fondant into a ball and gently insert into the hole - making the gumnut - repeat this process for as many gumnuts you wish to make.
Campfire
Step 1 - Blend some black and white fondant to make a greyish marble look to resemble rocks.
Step 2 -Roll them out as big as you need and place on top tier in a circle.
Step 3 -Next roll out small matchstick like brown fondant to resemble the sticks in the fire and place them on top of each other in different angles inside the rock circle.
Step 4 -Then using some orange fondant, roll out around five 1cm thick logs and gently flatten. Make one end pointy to resemble a flame.
Step 5 - Using your food colouring red pen, colour in the tip of the pointy end.
Step 6 - Place these on top the sticks and there you have your campfire.
Marshmallows
Step 1 - Using some leaf twigs, roll out tiny white fondant balls and insert them into the twig to resemble marshmallows on a stick.
Step 2 -Lay them on the rocks of the campfire.
Decorations
Step 1 -Use sprigs on either real or fake pine trees and attach to cake to look like trees.
Step 2 -To create the tee pee on top of the cake, cut out a rectangle from card roughly 7cm wide x 15cm long.
Step 3 -Decorate card with washi tape and then fold in center to create tent shape and place on top of cake in position.
Step 4 - Lastly to create the banner across the bottom of the top tier, cut out the decorative strip across the top of an invitation included in the Camping Party set and wrap around the front of the cake.
*Remove all decorations before serving and eating.


