 | ||
| Your browser is not supported. | ||
|
Please browse our site using any of the following options:
| ||
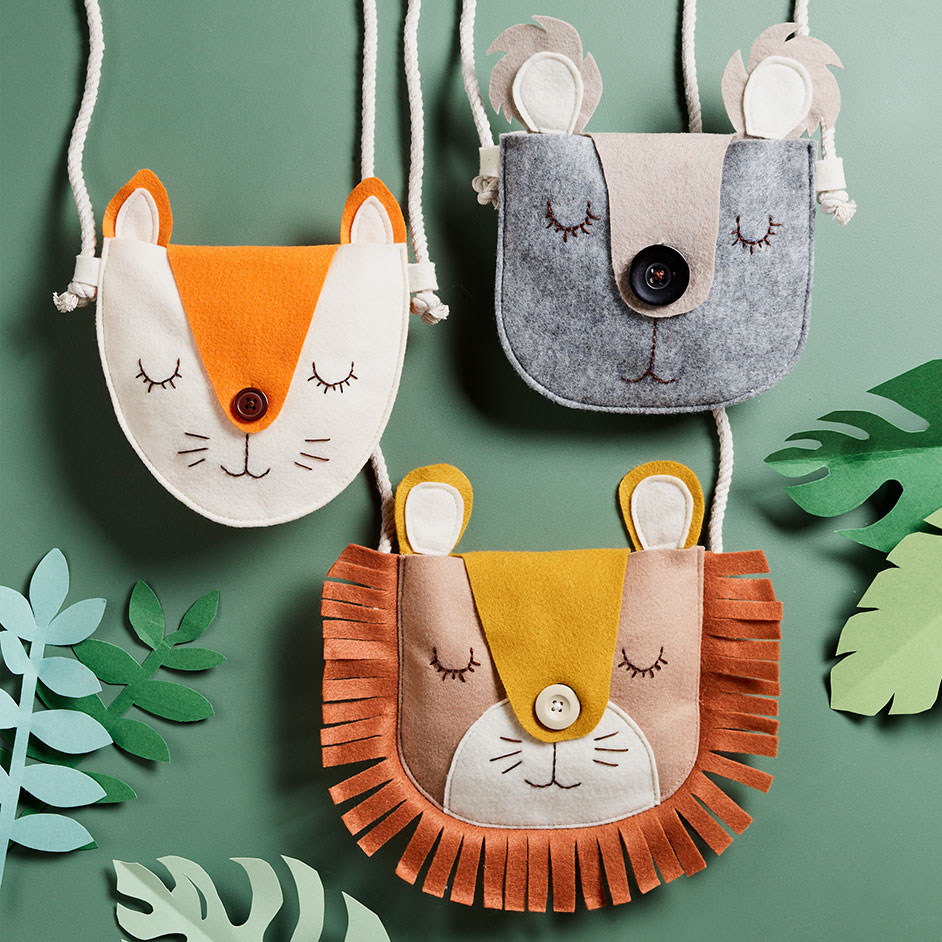
FELT ANIMAL BAGS

Level: Easy
WHAT YOU'LL NEED
- Templates
- Assorted Felt Sheets and Felt Fabric - depending on the colours you want for your design.
- Sewing machine and matching thread
- Scissors
- Pins
- Hand sewing needle
- Embroidery thread
- Button
- Rope/cord
INSTRUCTIONS
Lion
Step 1 - Trace around templates onto your felt fabric. You may want to use a contrasting fabric on the back and front panels.
Step 2 - To create the long-fringed mane cut a piece of felt 46cm long x 4cm wide. Cut along 1 of the long edges every 1cm, be sure to cut across to the other side but not all the way through. This will create the fringed piece for the mane.
Step 3 - Place the face piece onto the front panel of bag, pin in place. Top stitch around the edge roughly 3mm from the edge. Repeat with the earpieces on the back panel of the bag and top stitch in place.
Step 4 - Use the embroidery thread to hand stitch the lions features such as eyes, whiskers and mouth. We used a simple running stitch, but you can be as creative as you like!
Step 5 - Hand sew the button onto the front of bag to create nose. Line up where the buttonhole needs to be on the back panel. Use a sewing machine to stitch the buttonhole in place or alternatively you can just cut a slit into the felt as the fabric won't fray.
Step 6 - Now it's time to assemble the bag. Lay the mane piece onto the front panel with the fringe edge lying flat onto the face, this will ensure it is on the right side of the bag when finished. Stitch in place with a 6mm seam allowance.
Step 7 - Then take the 2 small tab pieces and fold in half, place close to the top edge of bag and again ensure the tab is facing inwards so it will be on the right side once turned out. These will be the casing for the cord of the bag. Pin in place.
Step 7 - Place the front and back panels together with right sides facing in. Pin along the outside edge and sew together with a 1cm team allowance. This will sandwich the tabs in between the layers.
Step 8 - Snip into the curved seam allowance to help it sit smoothly once turned through. Turn bag right side out.
Step 9 - To finish thread cord or rope through the tabs and tie in a knot to secure.
Koala and Fox
Step 1 - Trace around templates onto your felt fabric. You may want to use a contrasting fabric on the back and front panels.
Step 2 - Place the earpieces on the back panel of the bag and top stitch in place.
Step 3 - Use the embroidery thread to hand stitch the fox and koala features such as eyes, whiskers and mouth. We used a simple running stitch, but you can be as creative as you like!
Step 4 - Hand sew the button onto the front of bag to create nose. Line up where the buttonhole needs to be on the back panel. Use a sewing machine to stitch the buttonhole in place or alternatively you can just cut a slit into the felt as the fabric won't fray.
Step 5 - Now it's time to assemble the bag. Lay the earpieces onto the front panel with the fringe edge lying flat onto the face, this will ensure it is on the right side of the bag when finished. Stitch in place with a 6mm seam allowance.
Step 6 - Then take the 2 small tab pieces and fold in half, place close to the top edge of bag and again ensure the tab is facing inwards so it will be on the right side once turned out. These will be the casing for the cord of the bag. Pin in place.
Step 7 - Place the front and back panels together with right sides facing in. Pin along the outside edge and sew together with a 1cm seam allowance. This will sandwich the tabs in between the layers.
Step 8 - Snip into the curved seam allowance to help it sit smoothly once turned through. Turn bag right side out.
Step 9 - To finish, thread cord or rope through the tabs to create the bag handle. Cut cord to desired length and tie a knot at both ends below tabs to secure in place.


