 | ||
| Your browser is not supported. | ||
|
Please browse our site using any of the following options:
| ||
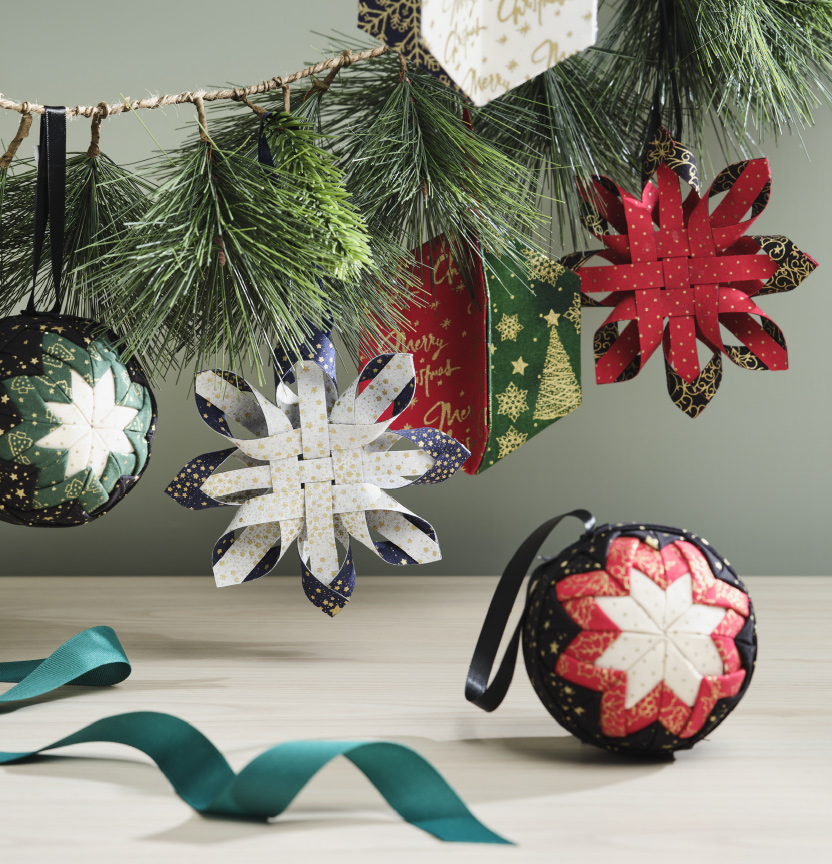
NO SEW CHRISTMAS ORNAMENTS

Level: Intermediate
What you'll need:
Ornament 1:
- 3 different Metallic Christmas fabrics (25cm each)
- 4" Styrofoam ball
- 500 Dressmaker pins
- Ribbon for hanging
Ornament 2:
- 2 contrasting metallic Christmas Fabrics (you only need a 6.5" square each of two different fabrics so this is a great scrap buster project)
- Heat and bond
- Hot glue gun
- Ribbon for hanging
Ornament 3:
- 2 contrasting metallic Christmas Fabrics (you only need a small amount, so this is a great scrap buster project)
- 4 x 2.5" hexagon paper pieces
- Ribbon for hanging
- Hot glue gun and glue stick
Instructions
Ornament 1 - Quilted Star Bauble
Step 1- Cut your fabrics into 2.5" squares. You will need 8 squares from the fabric you choose to be the middle star, and 16 squares each from your other two colours. You will also need a strip of fabric 12" x 2.5" out of the same fabric that you choose to be your outer star layer.
Step 2- Before you attach the first piece of fabric, you need to find the center of the square. To do this, simply fold and crease the fabric in half vertically, then repeat horizontally. The point where the creases cross is the exact center of the fabric. Put a pin through the wrong of the fabric and pin it into the Styrofoam ball. The front side will be against the ball now.
Step 3- Fold the square you have pinned to the ball upward horizontally, forming a rectangle. The fold will now be on the bottom. Fold the top corners inward to the middle to form a triangle. Using the sewing pins, place two just on either side of the bottom middle to hold the flaps down, then pin one on each of the two outside bottom triangle corners to secure it to the ball. (This method of making and pinning the triangle will be used repeatedly throughout the ornament.)
Step 4- Repeat the previous two steps, aligning the bottom of the new fabric square to the top of the first triangle. This time fold the fabric down toward the top of your first triangle. Repeat the same pinning pattern to attach the second triangle. You'll now have two fabric triangles with the points facing each other.
Step 5- Repeat the previous steps until you have 4 triangles all meeting in the middle.
Step 6- Take the second fabric (middle layer) and find the center. Pin the center of the fabric 1/2" down from the top of any first-layer triangle. It is important to keep the center lines straight.
Step 7- Attach three more middle fabric squares 1/2" down on the center lines of each original triangle.
Step 8- Still using your middle layer fabric, place four new squares at a diagonal to the other middle-layer triangles. Pin new triangles on the lines that divide the first layer 1/2" down from the center.
Step 9- Repeat these steps using your final layer of fabric. Your edges will be close to the middle line running around the circumference of the Styrofoam ball.
Step 10- Repeat Steps 2-9 to complete the opposite side of the ornament.
Step 11- Take the long strip of fabric and fold the edges into the middle so the fabric is in thirds. Pin one end to the middle circumference of your ball, covering the pins you have used to secure the final layers down. Wrap this around the entire middle of the ball, and using pins or a glue gun, secure the end down. Make a loop with your matching ribbon and pin or glue to where you have joined the middle band.
Ornament 2 - Scandinavian Star Ornament
Step 1- Star with the two 6.5" fabric squares and iron on the heat and bond to the back of each of the fabrics.
Step 2- Peel off the paper from both squares and place them wrong sides together. Iron them together to secure.
Step 3- Square up your joined square to be 6" square. Then sub-cut into 12x 1/2" strips.
Step 4- Take 6 of the strips and weave them into a lattice-like pattern (Figure 1). Leave a small space between each of the strips. Use a hot-glue gun to keep everything in place.
Step 5- Curl up the ends of the strips in the corners (Figure 2) and glue them together to create the first stages of the star shape. Repeat with the other three corners.
Step 6- Repeat steps 4 and 5 to make your second side of the star.
Step 7- Place the two sides of the star together back to back and rotate one side slightly so that the remaining straight strips in the middle top and sides are now sitting on top of the corner loops from the back side.
Step 8- Tuck the strips through the loops, and secure with a glue gun.
Step 9- Thread a ribbon through one of the loops, tie the ends into a knot and then trim away the excess.
Ornament 3 - Hexagon Ornament
Step 1- Baste your fabric onto the hexagon paper pieces using a glue stick to hold the fabric down.
Step 2 - Fold the hexagons in half, on point, right sides together. Leave the papers inside the hexagons.
Step 3- Run a line of hot glue along one half of a hexagon (on the back side) and attach it to a second hexagon (make sure you are using two different fabric prints here).
Step 4- Repeat step 3 with the other two hexagons.
Step 5- Cut a piece of ribbon long enough to hang the ornament and hot glue this to top part of the back of one of your joined halves.
Step 6- Using hot glue, join the two halves together.


