 | ||
| Your browser is not supported. | ||
|
Please browse our site using any of the following options:
| ||
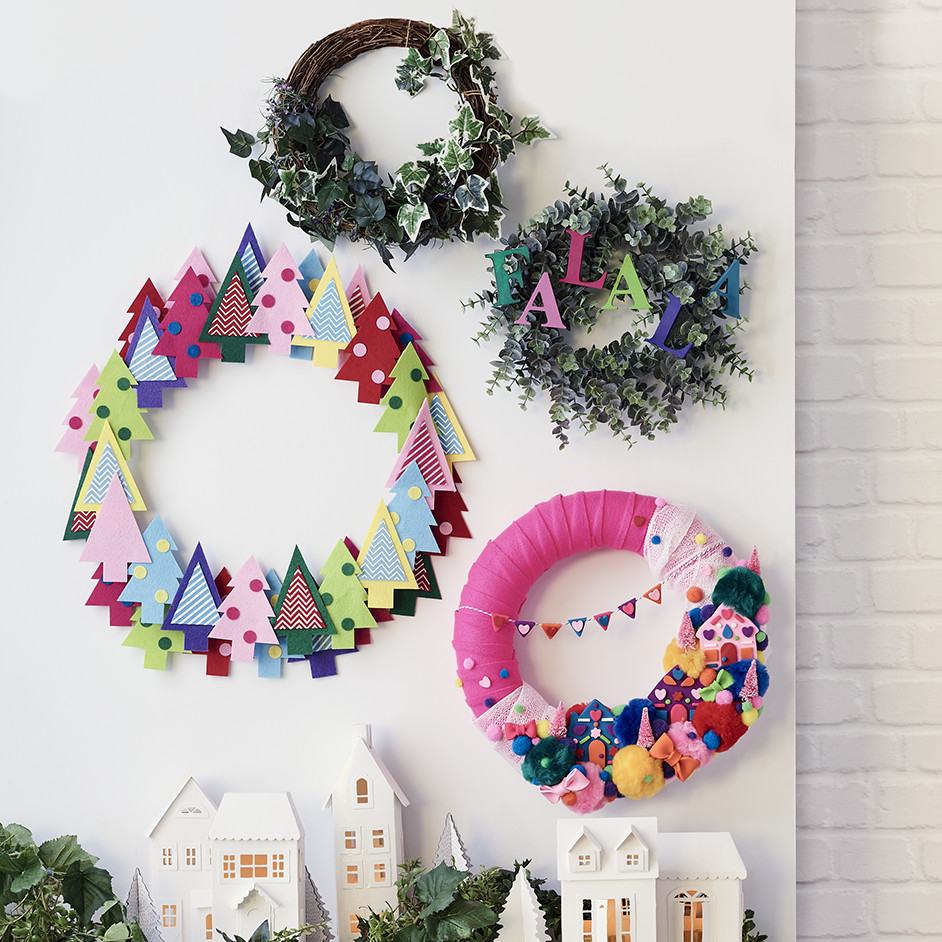
JOLLY & BRIGHT CHRISTMAS WREATHS

LEVEL: EASY
WHAT YOU'LL NEED:
SCULPEY HOUSE WREATHS
- Decofoam wreath
- Felt sheets bright pink
- Sculpey III (12 Piece Mulitpack - Brights)
- Sculpey Premo Mini Metal Cutters
- Sculpey Modelling Tools
- Large Multi Coloured Pom Poms Pack
- Crafters Choice Assorted Pom Pom sizes and colours
- Jolly and Joy Mini trees Pink
- Natural Twine for bunting
- AB Floral Mesh
- Oven/Oven Tray
- Baking Paper
- Hot glue gun and glue sticks
- Pins
FELT TREE WREATH
- 2 x packets of Felt tree bunting
- Wire wreath
- Hot glue gun and glue sticks
- Scissors
FA LA LA WREATH
- Eucalyptus wreath
- Kaisercraft Timber letters: 9cm
- Acrylic paint
- Paint brushes, small and medium sized
INSTRUCTIONS
SCULPEY HOUSE WREATH
Step 1 - To create sculpey houses and decorations use the sculpey that is included in the bright kit and roll out colours to about 0.5cm thick. Use the metal cutters and house cutter to cut out the shapes from sculpey and decorate your houses with. Gently press your sculpey shapes into the house and set aside to bake. Repeat this process for 3 houses.
Step 2 - To create bows roll out sculpey into a flat 0.5cm shape and cut a long rectangle from the sculpey using the cutting tool. Pinch the ends of the rectangle and fold them to meet in the centre, gently squeeze all layers of the sculpey together in the centre to create your bow shape. Then roll out another piece of sculpey to cut a smaller rectangle shape from, wrap this around the centre of your bow to finish. Repeat this process in different colours for as many bows as you would like, again set aside ready to bake.
Step 3 - For the bunting roll out sculpey again to 0.5cm thick and using the cutting tool cut out triangle shapes for your bunting. Also cut out a bunch of the shapes using the mini metal cutters to stick onto your bunting but also for decorating your wreath later on. Set aside ready to bake.
Step 4 - Bake all the sculpey pieces following the instructions on the packet. Put the pieces between 2 sheets of baking paper and place on a metal or glass surface in the oven. Bake at 130C for 15 minutes. Allow scullpey to cool before handling.
Step 5 - It's now time to assemble the wreath. Cut strips of the pink felt about 4cm wide. Start on the back side of the wreath and use a pin to secure one end of the felt onto the wreath. Wrap felt around the wreath on a slight angle ensuring you overlap the felt so none of the deco foam is visible. Continue pinning felt and wrapping until the entire wreath is covered.
Step 6 - Use the floral mesh and again pin in place on the back side of the wreath. Wrap it loosely around to cover roughly half the wreath and pin to secure.
Step 7 - Turn on your hot glue gun and begin to plan where you want your decorations to go. Start by gluing the large pom poms in place followed by your sculpey houses. To position the houses you may need to use some of the smaller pom poms to help prop them upright.
Step 8 - Then continue gluing the multi sized pom poms, mini pink trees, sculpey bows and shapes onto the wreath filling any gaps.
Step 9 - To create the bunting glue the shapes onto a piece of twine along the top edge of the triangle shapes. To position the bunting, use glue and pins to hold the ends of the twin in place on the wreath.
FELT TREE WREATH
Step 1 - Use scissors to cut the felt trees off the twine in the bunting packs.
Step 2 - Roughly lay out the felt trees in an order so you know which way to glue them down and make sure you have enough to cover both layers of the wreath.
Step 3 - Starting with the top level, use a hot glue gun to glue the felt trees in place on the wire wreath overlapping slightly so there are no gaps.
Step 4 - Then repeat step 3 with the bottom level again ensuring the trees are glue evenly between the spaces to create a full looking wreath!
FA LA LA WREATH
Step 1 - Use acrylic paint and a paint brush to paint wooden letters in chosen colours.
Step 2 - Wait for paint to dry before painting on another coat. Continue painting coats until you have a strong colour you are happy with.
Step 3 - Once the letters are finished drying, space them out evenly and attach each one individually with fishing line to the wreath.
Hang all your wreaths together in a group or individually to bring a jolly and bright atmosphere to your Christmas!


