 | ||
| Your browser is not supported. | ||
|
Please browse our site using any of the following options:
| ||
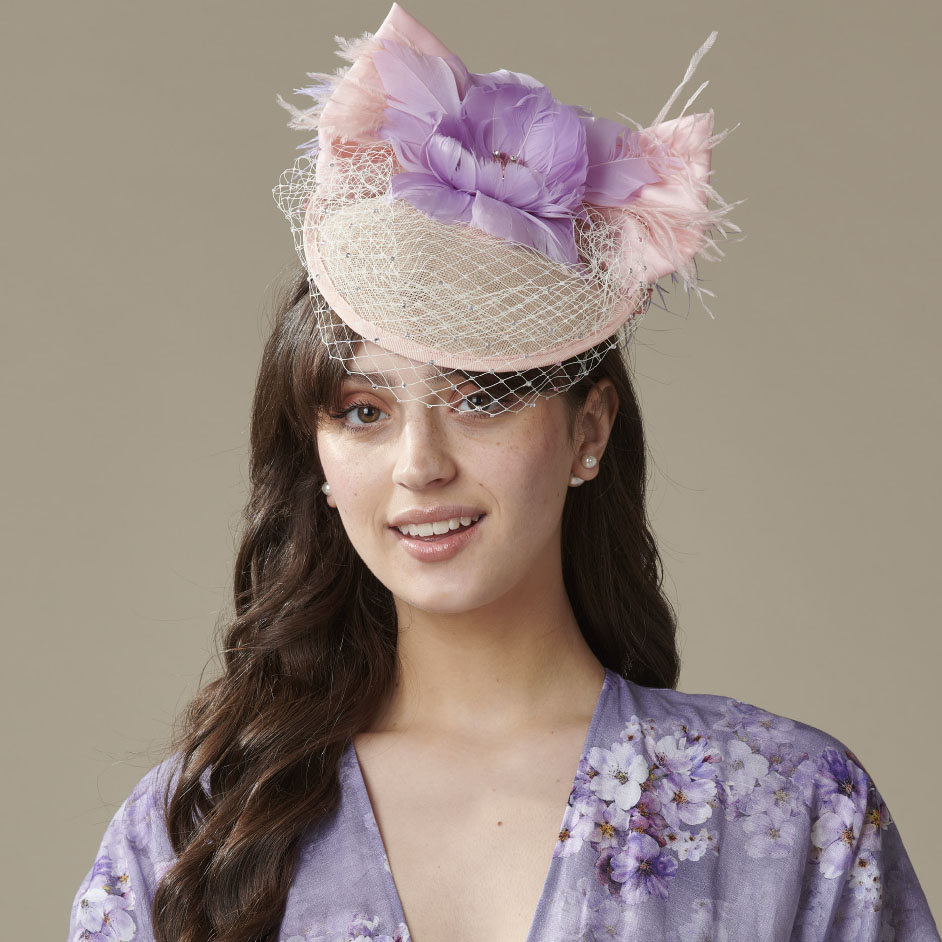
PINK & LILAC HEADPIECE

LEVEL: INTERMEDIATE
WHAT YOU'LL NEED:
- Craft Scissors
- Tweezers
- Unpicker
- Thread
- Craft Glue or a Glue Gun
- 1x Pack Glue Sticks
- 1x Pink Hat Base Millinery by Maria George: Paper Base (Blush)
- 1x Pink Bow Headband Millinery by Maria George: Satin Big Bow on Headband (Blush)
- 1x Mauve Feather Flower Headband Millinery by Maria George: Feather Flower on Headband (Lilac)
- 2x Pink Emu Feather Bunches (1 pack) Millinery by Maria George: Emu Feather Bunch (Blush)
- 2x Mauve Emu Feather Bunches (1 pack) Millinery by Maria George: Emu Feather Bunch (Lilac)
- 1x Pink Large Beaded Flower (1 pack) Millinery by Maria George: Acrylic Flower Beaded (Blush)
- 1x Mauve Large Beaded Flower (1 pack) Millinery by Maria George: Acrylic Flower Beaded (Lilac)
- 65cm Ivory Veiling (1 pack) Millinery by Maria George: Veiling (Natural)
- Small Gemstones - Crafters Choice: Acrylic Transparent Gems 280gms (Multi-coloured)
Optional
- 1x Heatproof Mat, Gloo: Heat Resistant Gloo Mat If using a glue gun
- 2x Pink Small Beaded Flowers (1 pack) Millinery by Maria George: Acrylic Flower Jewel (Blush)
- 1-2x Coloured markers the same as beaded flowers (Pink and Mauve)
- 1x Hair Comb
INSTRUCTIONS
Step 1 - Carefully remove the satin bow from pink headband.
TIP you may need to unpick some threads.
Step 2 - Choose which side of the satin bow you will use as the front, then using tweezers, glue a bunch of pink emu feathers inside the knot on either side.
TIP Use the flattest side of the bow's knot at the back as it'll sit on the headpiece better.
Step 3 - Mark the centre back of the headpiece with a pin.
Place the back of the bow at the centre back of the headpiece, then glue the knot. Glue either side of the bow onto the headpiece.
TIP The bottom edges should sit nicely along the headpiece.
Step 4 - Carefully remove the feather flower from headband by twisting the base it sits on, around the headband.
TIP Use a bit of steam to loosen the glue if needed. Do not try to pull the feather off the base or it will fall apart / damage the feathers!
Step 5 - OPTIONAL Colour around the edges of the beaded flowers with a marker, so you can't see the white felt.
Glue 1 large pink beaded flower inside the middle of the feather flower.
Glue feather flower in front of bow's knot.
TIP Try to hide the knot! Decide which way the feather sits best by checking from the side.
Step 6 - Join mauve emu feathers, end to end in a bow shape using glue or thread.
Glue onto the centre back of the headpiece, behind the satin bow.
Cover the join by gluing on a large mauve beaded flower on top of the feathers.
Step 7 - Cut 65cm of veiling. Make one edge of the veiling shorter by cutting to 35cm.
TIP Cut 15cm off either end on a 45 degree angle.
Step 8 - Gather one of the angled sides of veiling, then tie with thread. Repeat on the other side. Glue one end of the veiling to underneath one side of the feather flower. Repeat.
TIP The veiling should curve nicely but not too tightly around the front edge of the headpiece. Check the placement of the veiling and pin in place before gluing.
Carefully glue some of the top edge of the veiling, underneath the bottom of the feather flower.
TIP Use tweezers to hold the feather out of the way and don't use too much glue. Craft glue is best!
Step 9 - Add gemstones onto veiling using craft glue.
TIP You only need a tiny bit of glue. It's easiest to apply the glue to the veiling, then use tweezers to place the gemstones.
OPTIONAL Glue some of the veiling to the underneath of the headpiece near the bow, this will give it a better shape. Cover with a small, beaded flower.
OPTIONAL Add a hair comb to the bottom of the headpiece if needed.
TIP Adjust the angle of the headpiece by moving it along the headband, then test how the headpiece will sit best with preferred hair style.


