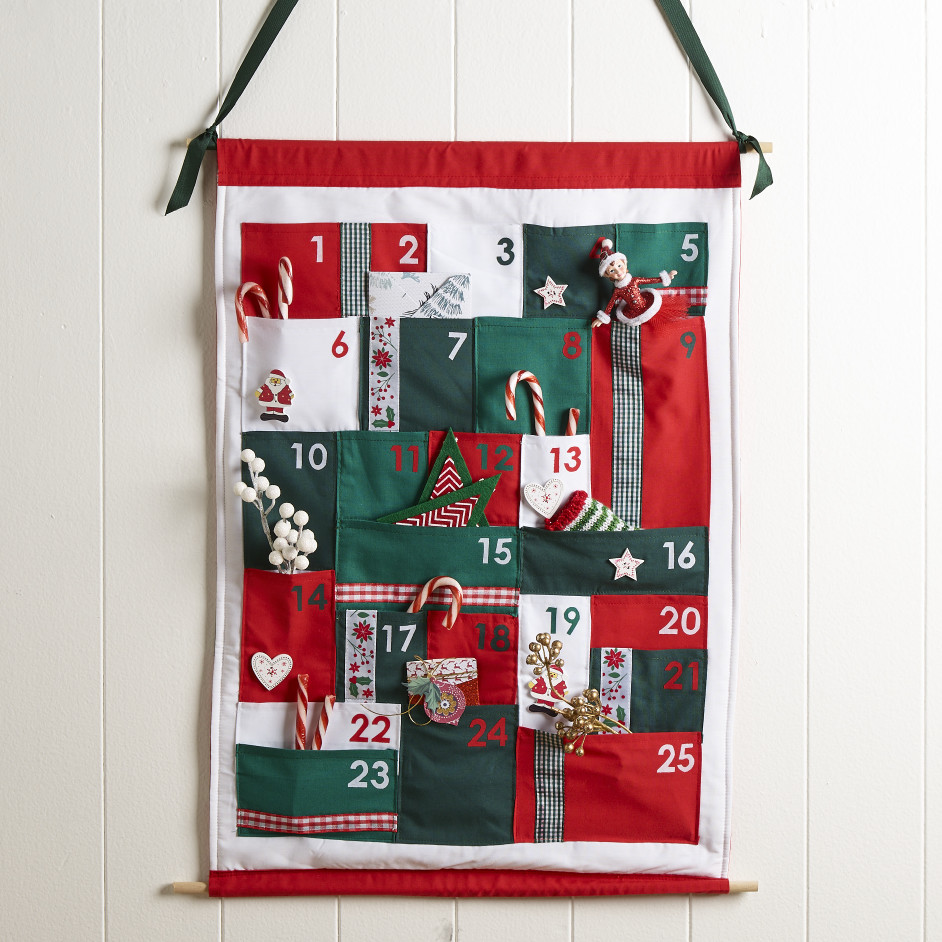
 | ||
| Your browser is not supported. | ||
|
Please browse our site using any of the following options:
| ||
FABRIC ADVENT CALENDAR

LEVEL: INTERMEDIATE
WHAT YOU'LL NEED:
- 48cm wide by 62cm high of white poplin fabric(background)
- 48cm wide by 76cm high of red poplin fabric(backing and rod pockets)
- 23cm of 112cm wide of red poplin fabric (pockets)
- 78cm of 112cm wide of white poplin fabric (pockets)
- 98cm of 112cm wide of green poplin fabric (pockets)
- 98cm of 112cm wide of dark green poplin fabric (pockets)
- White poplin for numbers
- Vliesofix
- Assorted Christmas buttons and ribbons to decorate pockets
- 2x 60cm lengths of thin dowel rod
- Ribbon to hang
- 48cm wide by 62cm high of thin fusible pallon wadding
- Scissors, Pins, Safety pin, Tape measure/ruler
- Sewing machine & matching thread
- Iron
- Cricut Machine optional
INSTRUCTIONS
Step 1 - Pockets Cut from red fabric: (pocket numbers 1, 2, 9, 12, 14, 18, 20 & 25)
- 4x 11cm high by 10cm wide
- 1x 13cm high by 10cm wide
- 1x 21cm high by 12cm wide
- 1x 13cm high by 6cm wide
- 1x 13cm high by 18cm wide
Cut from white fabric: (pocket numbers 3, 6, 13, 19 & 22)
- 1x 11cm high by 10cm wide
- 1x 13cm high by 12cm wide
- 1x 11cm high x 8cm wide
- 1x 13cm high x 8cm wide
- 1x 7cm high by 16cm wide
Cut from dark green fabric: (pocket numbers 4, 7, 10, 16, 17, 21 & 24)
- 2x 11cm high by 10cm wide
- 1x 13cm high by 12cm wide
- 1x 15cm high by 10cm wide
- 1x 9cm high x 18cm wide
- 1x 9cm high by 12cm wide
- 1x 15cm high x 12cm wide
Cut from green fabric: (pocket numbers 5, 8, 11, 15 & 23)
- 2x 11cm high by10cm wide
- 1x 13cm high by 12cm high
- 1x 9cm high x 18cm high
- 1x 11cm high x 16cm wide
The pockets are all made the same way, they just differ in size. Press under 1cm along the base and two side edges of each pocket piece of fabric. Press under a double hem along the top edge, by pressing under 1cm then another 1cm. Top stitch double hem in place.
Step 2 - Using an iron, fuse Vliesofix to back of white poplin fabric. Draw or trace numbers on to paper in reverse approximately 24mm high. Cut numbers out, and peel paper backing from back of numbers. Place numbers right way up on top of the corresponding pockets (as per layout) in the right top corner. Iron numbers to fuse to pockets. A Cricut Machine can also be used to cut out the numbers. If desired, embellish some pockets with ribbon or trim by sewing to pockets, folding raw edges of trim under the pressed edges of pocket. Buttons can also be added for decoration.
Step 3 - Pin pockets to the white back ground fabric as per layout ensuring there is 4cm of white fabric on either side and 5cm of white fabric on the top and base of pockets. Sew each pocket to white fabric 2mm in from each side and base edge of the pockets, leaving the top edges open. Lay wadding glue side up. Place the wrong side of the front fabric with pockets on top. Fuse wadding to fabric with pockets.
Step 4 - With right sides facing, pin the red poplin backing piece over the top of the white front with pockets, aligning side edges and having the red fabric with 8cm over hang at the top and a 6cm over hang at the base. Sew together at sides with a 15mm seam allowance. Trim wadding back to seam at sides and turn fabrics right way out. Press sides flat and press under 15mm seam
allowance on the sides of the red fabric over hang. Top stitch 5mm in from side edges, along both side edges including the pressed seam allowance of red fabric.
Step 5 - To make the rod pocket for the top of the advent calendar, press under 1cm along top raw edge then press under another 4.5cm. Pin pressed edge to the top of the white fabric and top stitch in place in a double row of stitching. To make the bottom rod pocket, press under 1cm along base edge then press under another 3cm. Pin pressed edge to the top of the white fabric and top stitch in place in a double row of stitching.
Step 6 - Insert dowel rod into pockets with an even overhang of dowel on either side of the calendar. The base dowel can be trimmed if desired to fit just inside the width of the rod pocket. Tie ribbon to each side of the top dowel and adjust length of hanger ribbon to desired lengths.


