 | ||
| Your browser is not supported. | ||
|
Please browse our site using any of the following options:
| ||
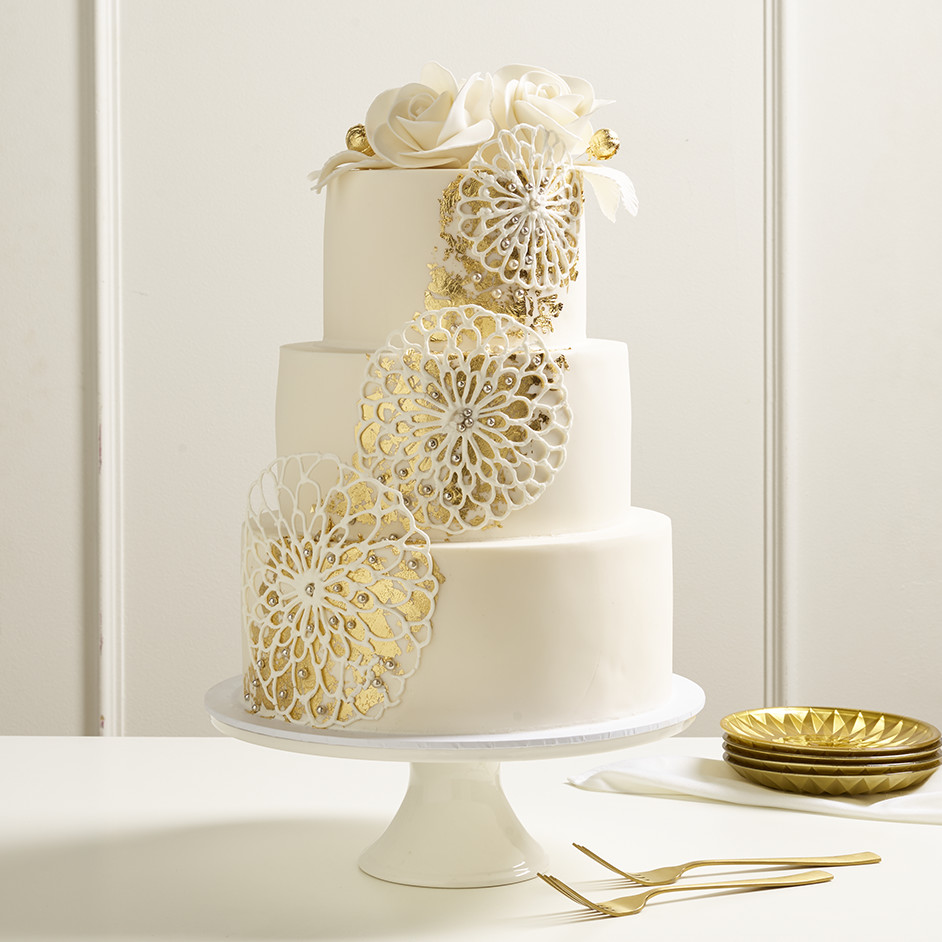
FONDANT AND GOLD LEAF 3 TIER CAKE

LEVEL: ADVANCED
WHAT YOU'LL NEED
- 6 inch round 'Mondo' pro cake pan
- 8 inch round 'Mondo' pro cake pan
- 10 in round 'Mondo' pro Cake pan
- Cake mix/batter to make 3 x 3-4 inch high cakes in above sized tins (this design each tier is 4 inches high)
- 14 inch white 'Mondo' round cake board
- 6 inch round 'Mondo' silver compressed cake board
- 8 inch round 'Mondo' silver compressed cake board
- 10 inch round 'Mondo' silver compressed cake board
- 'Mondo' cranked spatula
- 'Mondo' cake turntable
- 2 large buckets of 'Over The Top'buttercream (for filling and base under fondant, may require more depending on how much filling you use)
- Wide plastic drinking straws or dowels for supports x 8 (4 for bottom tier, 4 for middle tier)
- 'Fondtastic' White Fondant - 2-2.5kg approximately
- White gumpaste
- 'Mondo' Fondant Smoothers
- 'Mondo' Acrylic Smoothers
- 'Mondo' Fondant rolling pin
- 'Fondtastic' Fondant Mat
- 'Over The Top' Gold Leaf
- 'Over The Top' Silver Caschous (Pearls)
- Toothpicks
- 'Mondo' Fondant modelling tools
- 'Mondo' Balling Tools
- 'Mondo' Rose petal cutters
- 'Over The Top' Edible glue
- 'Mondo' Royal Icing Mix
- Piping bag
- 'Mondo' round tip #2
- Thin paint brush
INSTRUCTIONS
Step 1 - Baking - Bake cake according to instructions. 3 x 1 inch high layers of 6 inch, 8 inch rounds and 10 inch rounds. Alternatively, you can use 3-4 inch high cakes without torting (filling) layers with buttercream if you choose. This design you can choose to bake additional layers for middle tier up to 6 inch high if you wish to modify design. Let cakes cool and trim to level.
Step 2 - Buttercream Filling - Stack cakes on silver cake board with buttercream in between layers. Makes sure base of cake is stuck to cakeboard using buttercream or melted chocolate. It is easier to torte (fill) and cover cakes using piping bag to apply buttercream. Don't over fill piping bag, snip end and pipe onto each layer whilst turning cake turntable to assist with even spread. Smooth buttercream over outside of cake in thin layer with spatula and chill for at least 15 minutes. Crumb Coat: This initial crumb coat layer does not have to be perfect. The aim is to keep the crumbs of the cake from showing in the second layer.
Step 3 - Buttercream Cover - Repeat process of covering Crumb coat in smooth layer of buttercream for final outer layer if you want a perfect finish beneath fondant cover. Alternatively, you can use ganache instead of buttercream if you prefer as outer cover for cake prior to final cover in fondant.
Step 4 - Fondant Cover - Cover all tiers with white fondant using 'Fondtastic' mats to cover 10 inch cake - approx 900g (4 inch high) 8 inch cake - approx 700g, 6 inch cake - approx 500g Once covered, stack cakes.
Stacking Cakes
Fix 10 inch cake to 14 inch cake board. Use wide drinking straws as supports to top tier by pushing into 10 inch cake - 1 in centre and 4 within the 8 inch diameter to hold up middle tier. Cut excess straw so it is level with top of 10 inch cake. Repeat process with 8 inch cake. Gently place middle tier on top of 10 inch cake. Repeat process for 6 inch cake.
Stacked cakes require adequate supports to minimise risk of collapse.
Step 5 - Decorations - Prepare fondant or gumpaste according to instructions.
Sugar Roses
Use a small styrofoam sphere/gumpaste tear drop as inner support for gumpaste rose petals. Fix toothpick into rose inner. Use 'Mondo' Rose cutters to cut out Rose petals and assemble to make Rose. Use Edible glue (in very small amounts) to adhere Gumpaste petals to sphere/tear drop inner. Gently flare out rose petals to shape rose as you like.
Visit Moreish Cakes Youtube for Rose Tutorial
Gold Styrofoam/Fondant Spheres
Fix toothpick into sphere. Carefully remove gold leaf transfer sheet from packaging.
Gently wrap gold leaf around sphere.
Gold Leaf On Cake
Roughly brush, sponge small quantities of Over the Top Sugar glue to the areas you wish to adhere the gold leaf, you only need a tiny amount to make it sticky. Carefully remove gold leaf transfer sheet from packaging. Gently rub gold leaf onto side of cake. The gold leaf should create a diagonal pattern across all 3 tiers (not a straight line up and down). For a similar effect, spot patch the sections of the gold leaf so that it's not entire sheet at a time attaching as the idea is to make it look random and rustic.
Royal Icing Lattice
Prepare 'Mondo' Royal icing according to Instructions. Pipe lattice pattern onto baking paper. We used a number 1 piping tip. Place baking paper with complete lattice pattern carefully on side of styrofoam cake round that matches the size cake it will be stuck to the 8 inch round styrofoam for 8 inch round cake. Leave to dry for 6+ hours (ideally overnight)
Step 6 - Placing Decorations - Pipe small amount of Royal Icing onto cake where you want to fix dried Royal Icing lattice decorations. Be very careful during placement to minimise breakage.
Place silver Cachous carefully around lattice using royal icing to adhere.
Carefully place roses and other decorations into top tier.


